eDiscovery Daily Blog
Capturing Memory and Obtaining Protected Files with FTK Imager – eDiscovery Best Practices

Over the past few weeks, we have talked about the benefits and capabilities of Forensic Toolkit (FTK) Imager from AccessData (and obtaining your own free copy), how to create a disk image, how to add evidence items for the purpose of reviewing the contents of those evidence items (such as physical drives or images that you’ve created) and how to export files and create a custom content image of a targeted collection of files with FTK Imager. This week, let’s discuss how to Capture Memory and Obtain Protected Files to collect a user’s account information and possible passwords to other files.
Capture Memory
If you’re trying to access the contents of memory from an existing system that’s running, you can use a runtime version of FTK Imager from a flash drive to access that memory. From the File menu, you can select Capture Memory to capture data stored in memory within the system.
Capturing memory can be useful for a number of reasons. For example, if TrueCrypt is running to encrypt the contents of the drive, the password could be stored in memory – if it is, Capture Memory enables you to capture the contents of memory (including the password) before it is lost.
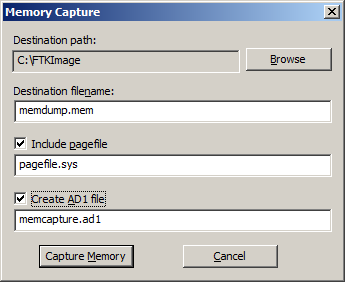
Simply specify the destination path and filename to capture memory to the specified file. You can also include the contents of pagefile.sys, which is a Windows system file that acts as a swap file for memory; hence, it can contain useful memory information as well. Creating an AD1 file enables you to create an AD1 image of the memory contents – then you can add it as an evidence item to review the contents.

Obtain Protected Files
Because Windows does not allow you to copy or save live Registry files, you would have to image the hard drive and then extract the Registry files, or boot the computer from a boot disk and copy the Registry files from the inactive operating system on the drive. From the File menu, you can select Obtain Protected Files to circumvent the Windows operating system and its file locks, thus allowing you to copy the live Registry files. If the user allows Windows to remember his or her passwords, that information can be stored within the registry files.
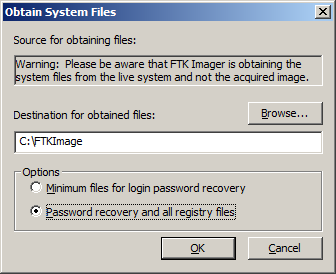
Specify the destination path for the obtained files, then select the option for which files you would like to obtain. The Minimum files for login recovery option retrieves Users, System, and SAM files from which you can recover a user’s account information. The Password recovery and all Registry files option is more comprehensive, retrieving Users, System, SAM, NTUSER.DAT, Default, Security, Software, and Userdiff files from which you can recover account information and possible passwords to other files, so it’s the one we tend to use.

For more information, go to the Help menu to access the User Guide in PDF format.
So, what do you think? Have you used FTK Imager as a mechanism for eDiscovery collection? Please share any comments you might have or if you’d like to know more about a particular topic.
Disclaimer: The views represented herein are exclusively the views of the author, and do not necessarily represent the views held by CloudNine Discovery. eDiscoveryDaily is made available by CloudNine Discovery solely for educational purposes to provide general information about general eDiscovery principles and not to provide specific legal advice applicable to any particular circumstance. eDiscoveryDaily should not be used as a substitute for competent legal advice from a lawyer you have retained and who has agreed to represent you.
