eDiscovery Daily Blog
Adding Evidence Items with FTK Imager – eDiscovery Best Practices

A couple of weeks ago, we talked about the benefits and capabilities of Forensic Toolkit (FTK) Imager, which is a computer forensics software application provided by AccessData, as well as how to download your own free copy. Then, last week, we discussed how to create a disk image. This week, let’s discuss how to add evidence items with FTK Imager for the purpose of reviewing the contents of evidence items, such as physical drives or images that you’ve created.
Adding Evidence Items Using FTK Imager
Last week, I created an image of one of my flash drives to illustrate the process of creating an image. Let’s take a look at that image as an evidence item.
From the File menu, you can select Add Evidence Item to add a single evidence item to the evidence tree. You can also select Add All Attached Devices to add all of the attached physical and logical devices (If no media is present in an attached device such as a CD- or DVD-ROM or a DVD-RW, the device is skipped). In this case we’ll add a single evidence item.
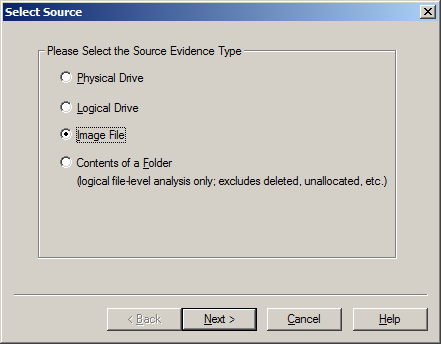
Source Evidence Type: The first step is to identify the source type that you want to review. You can select Physical Drive or Logical Drive (as we noted before, a physical device can contain more than one logical drive). You can also select an Image File to view an image file you created before or Contents of a Folder, to look at a specific folder. In this example, we’ll select Image File to view the image of the flash drive we created and locate the source path of the image file.

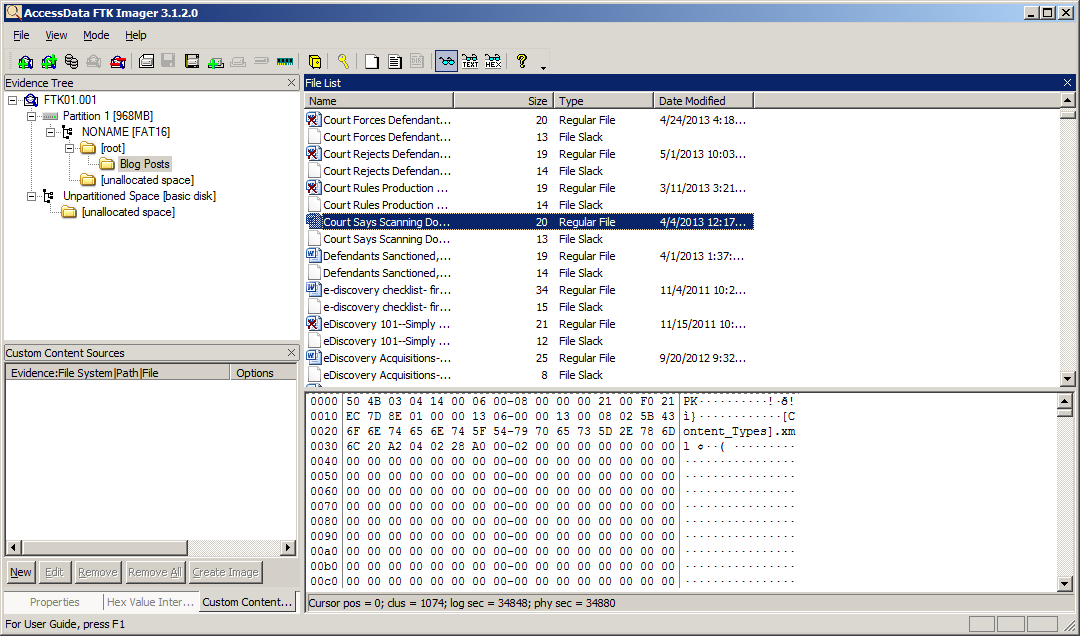
The evidence tree will then display the item – you can keep adding evidence items if you want to look at more than one at once. The top node is the selected item, from which you can drill down to the contents of the item. This includes partitions and unpartitioned space, folders from the root folder on down and unallocated space, which could contain recoverable data. Looking at the “Blog Posts” folder, you see a list of files in the folder, along with file slack. File slack is the space between the end of a file and the end of the disk cluster in which it is stored. It’s common because data rarely fills clusters exactly, and residual data occur when a smaller file is written into the same cluster as a previous larger file, leaving potentially meaningful data.

You’ll also notice that some of the files have an “X” on them – these are files that have been deleted, but not overwritten. So, with FTK Imager, you can not only view active data, you can also view inactive data in deleted files, file slack or unallocated space! When you click on a file, you can view the bit-by-bit contents of the file in the lower right window. You can also right-click on one or more files (or even an entire folder) to display a pop-up menu to enable you to export a copy of the file(s) out and review them with the native software. You can also Add to Custom Content Image to begin compiling a list of files to put into an image, enabling you to selectively include specific files (instead of all of the files from the device) into the image file you create.
Next time, we’ll discuss Add to Custom Content Image in more detail and discuss creating the custom content image of specific files you select.
For more information, go to the Help menu to access the User Guide in PDF format.
So, what do you think? Have you used FTK Imager as a mechanism for eDiscovery collection? Please share any comments you might have or if you’d like to know more about a particular topic.
Disclaimer: The views represented herein are exclusively the views of the author, and do not necessarily represent the views held by CloudNine Discovery. eDiscoveryDaily is made available by CloudNine Discovery solely for educational purposes to provide general information about general eDiscovery principles and not to provide specific legal advice applicable to any particular circumstance. eDiscoveryDaily should not be used as a substitute for competent legal advice from a lawyer you have retained and who has agreed to represent you.
