Preservation

Adverse Inference Sanction for Defendant who Failed to Stop Automatic Deletion – eDiscovery Case Law

Remember the adverse inference instructions in the Zubulake v. UBS Warburg and Apple v. Samsung cases?  This case has characteristics of both of those.

In Pillay v. Millard Refrigerated Servs., Inc., No. 09 C 5725 (N.D. Ill. May 22, 2013), Illinois District Judge Joan H. Lefkow granted the plaintiff’s motion for an adverse inference jury instruction due to the defendant’s failure to stop automatic deletion of employee productivity tracking data used as a reason for terminating a disabled employee.

Case Background

The plaintiff alleged that the defendant is liable for retaliation under the Americans with Disabilities Act (“ADA”) for terminating his employment after the plaintiff opposed the defendant’s decision to terminate another employee because of a perceived disability.  The defendant employed a labor management system (“LMS”) to track its warehouse employees’ productivity and performance.  Shortly after hiring the employee and telling him that his LMS numbers were great, the defendant fired the employee when it was determined that a prior work injury he suffered rendered him with a disability rating of 17.5 percent by the Illinois Industrial Commission, which prompted the senior vice president to send an email to the general manager stating “We have this all documented right? … Let’s get him out asap.”  The employee (and the plaintiff, for objecting to the termination) was terminated in August 2008 and the defendant contended that the employee’s termination resulted from his unacceptable LMS performance rating of 59 percent.

Deletion of LMS Data

In August 2009, the raw data used to create the employee’s LMS numbers were deleted because the LMS software automatically deleted the underlying data after a year. Before the information was deleted, the plaintiff and other terminated employee provided several notices of the duty to preserve this information, including:

  • A demand letter from the plaintiff in September 2008;
  • Preservation notices from the plaintiff and other terminated employee in December 2008 reminding the defendant of its obligations to preserve evidence;
  • Charges filed by both terminated employees with the Equal Employment Opportunity Commission (“EEOC”) in January 2009.

Also, the defendant’s 30(b)(6) witness testified that supervisors could lower an LMS performance rating by deleting the underlying data showing that an employee worked a certain number of jobs for a given period of time, which the plaintiff contended happened in this case.  As a result, the plaintiff filed a motion for the adverse inference jury instruction.

Judge’s Ruling

Noting that the defendant “relied on this information when responding to the EEOC charges, which occurred before the deletion of the underlying LMS data” and that “[i]nformation regarding the underlying LMS data would have been discoverable to challenge Millard’s explanation for Ramirez’s termination”, Judge Lefkow found that the defendant had a duty to preserve the LMS data (“A party must preserve evidence that it has notice is reasonably likely to be the subject of a discovery request, even before a request is actually received.”).

With regard to the defendant’s culpability in deleting the data, Judge Lefkow stated “[t]hat Millard knew about the pending lawsuit and that the underlying LMS data would be deleted but failed to preserve the information was objectively unreasonable. Accordingly, even without a finding of bad faith, the court may craft a proper sanction based on Millard’s failure to preserve the underlying LMS data.”

So, Judge Lefkow granted the plaintiff’s request for an adverse inference sanction with the following instruction to be given to the jury:

“Pillay contends that Millard at one time possessed data documenting Ramirez’s productivity and performance that was destroyed by Millard. Millard contends that the loss of the data was accidental. You may assume that such evidence would have been unfavorable to Millard only if you find by a preponderance of the evidence that (1) Millard intentionally or recklessly caused the evidence to be destroyed; and (2) Millard caused the evidence to be destroyed in bad faith.”

So, what do you think?  Should the adverse inference sanction have been awarded?  Please share any comments you might have or if you’d like to know more about a particular topic.

Disclaimer: The views represented herein are exclusively the views of the author, and do not necessarily represent the views held by CloudNine Discovery. eDiscoveryDaily is made available by CloudNine Discovery solely for educational purposes to provide general information about general eDiscovery principles and not to provide specific legal advice applicable to any particular circumstance. eDiscoveryDaily should not be used as a substitute for competent legal advice from a lawyer you have retained and who has agreed to represent you.

Capturing Memory and Obtaining Protected Files with FTK Imager – eDiscovery Best Practices

Over the past few weeks, we have talked about the benefits and capabilities of Forensic Toolkit (FTK) Imager from AccessData (and obtaining your own free copy), how to create a disk image, how to add evidence items for the purpose of reviewing the contents of those evidence items (such as physical drives or images that you’ve created) and how to export files and create a custom content image of a targeted collection of files with FTK Imager.  This week, let’s discuss how to Capture Memory and Obtain Protected Files to collect a user’s account information and possible passwords to other files.

Capture Memory

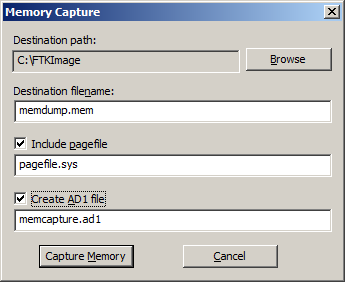
If you’re trying to access the contents of memory from an existing system that’s running, you can use a runtime version of FTK Imager from a flash drive to access that memory.  From the File menu, you can select Capture Memory to capture data stored in memory within the system.

Capturing memory can be useful for a number of reasons.  For example, if TrueCrypt is running to encrypt the contents of the drive, the password could be stored in memory – if it is, Capture Memory enables you to capture the contents of memory (including the password) before it is lost.

Simply specify the destination path and filename to capture memory to the specified file.  You can also include the contents of pagefile.sys, which is a Windows system file that acts as a swap file for memory; hence, it can contain useful memory information as well.  Creating an AD1 file enables you to create an AD1 image of the memory contents – then you can add it as an evidence item to review the contents.

Obtain Protected Files

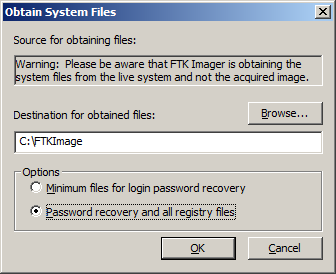
Because Windows does not allow you to copy or save live Registry files, you would have to image the hard drive and then extract the Registry files, or boot the computer from a boot disk and copy the Registry files from the inactive operating system on the drive. From the File menu, you can select Obtain Protected Files to circumvent the Windows operating system and its file locks, thus allowing you to copy the live Registry files.  If the user allows Windows to remember his or her passwords, that information can be stored within the registry files.

Specify the destination path for the obtained files, then select the option for which files you would like to obtain.  The Minimum files for login recovery option retrieves Users, System, and SAM files from which you can recover a user’s account information.  The Password recovery and all Registry files option is more comprehensive, retrieving Users, System, SAM, NTUSER.DAT, Default, Security, Software, and Userdiff files from which you can recover account information and possible passwords to other files, so it’s the one we tend to use.

For more information, go to the Help menu to access the User Guide in PDF format.

So, what do you think?  Have you used FTK Imager as a mechanism for eDiscovery collection?  Please share any comments you might have or if you’d like to know more about a particular topic.

Disclaimer: The views represented herein are exclusively the views of the author, and do not necessarily represent the views held by CloudNine Discovery. eDiscoveryDaily is made available by CloudNine Discovery solely for educational purposes to provide general information about general eDiscovery principles and not to provide specific legal advice applicable to any particular circumstance. eDiscoveryDaily should not be used as a substitute for competent legal advice from a lawyer you have retained and who has agreed to represent you.
Appellate Court Upholds District Court Discretion for Determining the Strength of Adverse Inference Sanction – eDiscovery Case Law

In Flagg v. City of Detroit, No. 11-2501, 2013 U.S. App. (6th Cir. Apr. 25, 2013), the Sixth Circuit held that the district court did not abuse its discretion in issuing a permissive rather than mandatory adverse inference instruction for the defendant’s deletion of emails, noting that the district court has discretion in determining the strength of the inference to be applied.

In this appeal, the plaintiff children of a murder victim argued that the district court did not go far enough in issuing a permissive adverse inference instruction against the defendants for the destruction of evidence; instead, they believed a mandatory adverse inference instruction was warranted.

During discovery, the plaintiffs had filed a motion for preservation of evidence that covered emails. The court granted the motion. Later, the plaintiffs asked the defendants to produce all emails for a number of city officials, including the mayor. However, the city had deleted and purged the email of several officials when they resigned, including those of the mayor. The district court found the city had acted “culpably and in bad faith” in destroying the emails. Though it denied the plaintiffs’ request for a default judgment and a mandatory adverse inference, it did grant their request for a permissive inference. The plaintiffs appealed the district court’s choice of sanction.

The Sixth Circuit reviewed the district court’s opinion for abuse of discretion. It found that the plaintiffs met all three elements required for an adverse inference instruction: that the defendants had an obligation to preserve the evidence they destroyed, that the defendants destroyed the evidence with a culpable state of mind, and that the destroyed evidence was relevant to the plaintiffs’ claim.

Because the district court has the power to decide the strength of the inference, the Sixth Circuit upheld its decision, despite noting that “[i]f the severity of a spoliation sanction were required to be based solely on the sanctioned party’s degree of fault, this Court likely would be compelled to agree with Plaintiffs that the district court abused its discretion. After all, ‘intentionality’ is the highest degree of fault contemplated by this Court . . . and the district court found it to be present in this case.”

So, what do you think?  Should the District Court decision have been upheld?  Please share any comments you might have or if you’d like to know more about a particular topic.

Case Summary Source: Applied Discovery (free subscription required).  For eDiscovery news and best practices, check out the Applied Discovery Blog here.

Disclaimer: The views represented herein are exclusively the views of the author, and do not necessarily represent the views held by CloudNine Discovery. eDiscoveryDaily is made available by CloudNine Discovery solely for educational purposes to provide general information about general eDiscovery principles and not to provide specific legal advice applicable to any particular circumstance. eDiscoveryDaily should not be used as a substitute for competent legal advice from a lawyer you have retained and who has agreed to represent you.
Changes to Federal eDiscovery Rules Are One Step Closer – eDiscovery Trends

In April, we referenced Henry Kelston’s report in Law Technology News that another major set of amendments to the discovery provisions of the Federal Rules of Civil Procedure is getting closer and could be adopted within the year.  Now, the amendments are one step closer to enactment as they have been approved for public comment.

Henry Kelston reports again in Law Technology News (Proposed Discovery Amendments Move to Public Comment), noting that “With minimal discussion and no significant dissent, the Judicial Conference of the United States’ Standing Committee on Rules of Practice and Procedure voted on June 3 to approve for public comment the full slate of proposed amendments” that was previously approved by its Advisory Committee on Civil Rules.

As we summarized previously, potential revisions that have impact to discovery include changes to Rules 26, 30, 31, 33, 34, 36 and 37.  As Kelston reports, “The package also includes changes to Rule 1, adding language to the text to emphasize that the responsibility to use the rules in order ‘to secure the just, speedy and inexpensive determination of every action’ lies with the parties as well as the courts, and inserting comment language to encourage cooperation among parties in applying the rules.”

Apparently, Rule 1 was the only rule to receive votes against it as it received three dissenting votes.  Nonetheless, the proposed amendments were voted on as a package by the standing committee, who voted unanimously in favor of approving the package for publication.

After anticipated publication for public comment later this summer, the public comment period for proposed rules is expected to last six months.  Kelston reports that the “advisory committee, anticipating a high level of public interest in the proposals, plans to hold public hearings in several cities around the U.S.”, with the first hearing “expected to being held in November in Washington, D.C., to coincide with the advisory committee’s next scheduled meeting.”

We’ll keep you posted as the amendments progress.

So, what do you think?  Are you pleased or concerned with the proposed amendments?  Please share any comments you might have or if you’d like to know more about a particular topic.

Disclaimer: The views represented herein are exclusively the views of the author, and do not necessarily represent the views held by CloudNine Discovery. eDiscoveryDaily is made available by CloudNine Discovery solely for educational purposes to provide general information about general eDiscovery principles and not to provide specific legal advice applicable to any particular circumstance. eDiscoveryDaily should not be used as a substitute for competent legal advice from a lawyer you have retained and who has agreed to represent you.

Export Files and Custom Content Images in FTK Imager – eDiscovery Best Practices

Over the past few weeks, we have talked about the benefits and capabilities of Forensic Toolkit (FTK) Imager from AccessData (and obtaining your own free copy), how to create a disk image and how to add evidence items with FTK Imager for the purpose of reviewing the contents of evidence items, such as physical drives or images that you’ve created.  This week, let’s discuss how to export files and how to create a custom content image of a targeted collection of files.

Sometimes, you don’t want to create an image of the entire drive; instead, you’d like to perform a targeted collection or export individual files to review them.  Let’s discuss how to do that.

Export Files

As we discussed last time, you can Add Evidence Item to add a single evidence item to the evidence tree.  You can select a Physical Drive or Logical Drive, an Image File to view an image file created before or Contents of a Folder, to look at a specific folder.  You can also Add All Attached Devices to add all of the attached physical and logical devices.  When you select one or more evidence items, the selected items will be displayed in the Evidence Tree on the left hand side; navigate to the folder you want and it will display the contents on the right hand side.

Select one or more files (use Ctrl+Click to select multiple files or Shift+Click to select a range of files), then right-click on one of the files to display a popup menu.

Select Export Files to export the selected files, then FTK Imager will prompt you for a folder where the files will be saved.  The files will be saved to that folder.  Exporting files can be useful to pull a copy of selected files out of a forensic image for review.

Create Custom Content Image

As you’ll notice in the previous section, when you display the popup menu, another choice is to Add to Custom Content Image (AD1).  This enables you to start building a targeted list of files to be included in a custom image – useful if you want a specific group of files and not everything on the evidence item.

Any files that you select will then be added to the Custom Content Sources pane in the lower left window.  Continue adding items by repeating this step until you’ve specified or selected all the evidence files you want to add to this Custom Content image.  You can also use the Edit button to open the Wild Card Options dialog and select all files that meet a certain criteria (e.g., “My Documents|*.doc” will collect all files with a .doc extension in any folder named My Documents).

Once you have built your desired list of files, you can then build your Custom Content Image.  Select Create Custom Content Image from the file menu.  You can then repeat the steps for the Create Image, Evidence Item Information, Select Image Destination, Drive/Image Verify Results and Image Summary forms as illustrated in our earlier post How to Create an Image Using FTK Imager.  The resulting image will have an AD1 extension.  Then, this image can be examined just like any other image.

For more information, go to the Help menu to access the User Guide in PDF format.

Next time, we will discuss how to Obtain Protected Files to collect a user’s account information and possible passwords to other files.

So, what do you think?  Have you used FTK Imager as a mechanism for eDiscovery collection?  Please share any comments you might have or if you’d like to know more about a particular topic.

Disclaimer: The views represented herein are exclusively the views of the author, and do not necessarily represent the views held by CloudNine Discovery. eDiscoveryDaily is made available by CloudNine Discovery solely for educational purposes to provide general information about general eDiscovery principles and not to provide specific legal advice applicable to any particular circumstance. eDiscoveryDaily should not be used as a substitute for competent legal advice from a lawyer you have retained and who has agreed to represent you.
Adding Evidence Items with FTK Imager – eDiscovery Best Practices

A couple of weeks ago, we talked about the benefits and capabilities of Forensic Toolkit (FTK) Imager, which is a computer forensics software application provided by AccessData, as well as how to download your own free copy.  Then, last week, we discussed how to create a disk image.  This week, let’s discuss how to add evidence items with FTK Imager for the purpose of reviewing the contents of evidence items, such as physical drives or images that you’ve created.

Adding Evidence Items Using FTK Imager

Last week, I created an image of one of my flash drives to illustrate the process of creating an image.  Let’s take a look at that image as an evidence item.

From the File menu, you can select Add Evidence Item to add a single evidence item to the evidence tree.  You can also select Add All Attached Devices to add all of the attached physical and logical devices (If no media is present in an attached device such as a CD- or DVD-ROM or a DVD-RW, the device is skipped).  In this case we’ll add a single evidence item.

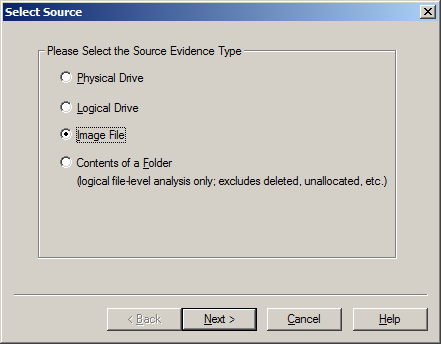
Source Evidence Type: The first step is to identify the source type that you want to review.  You can select Physical Drive or Logical Drive (as we noted before, a physical device can contain more than one logical drive).  You can also select an Image File to view an image file you created before or Contents of a Folder, to look at a specific folder.  In this example, we’ll select Image File to view the image of the flash drive we created and locate the source path of the image file.

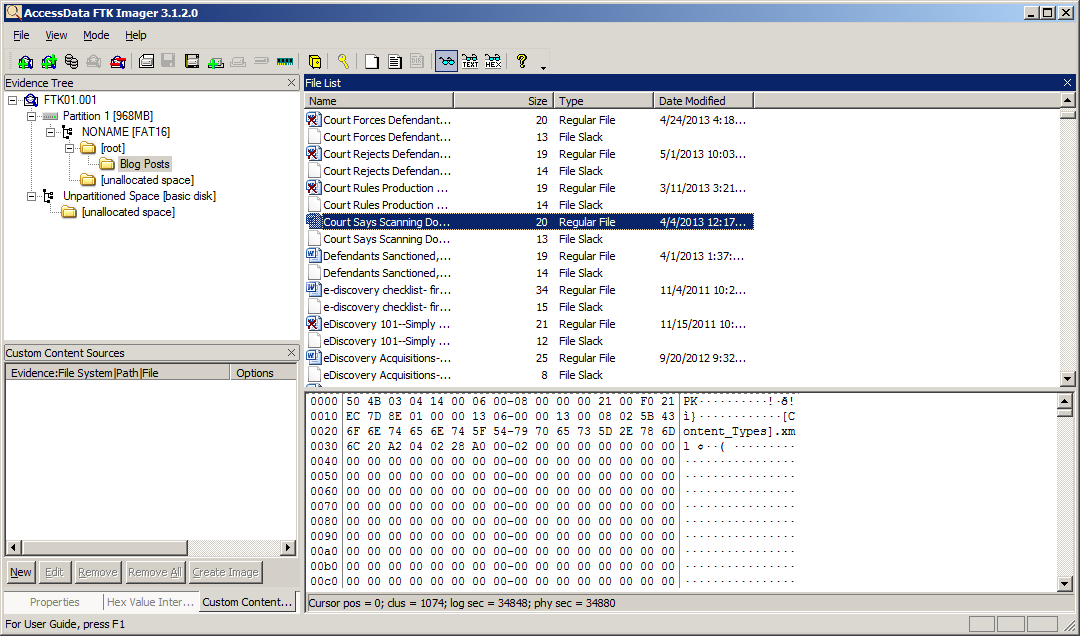
The evidence tree will then display the item – you can keep adding evidence items if you want to look at more than one at once.  The top node is the selected item, from which you can drill down to the contents of the item.  This includes partitions and unpartitioned space, folders from the root folder on down and unallocated space, which could contain recoverable data.  Looking at the “Blog Posts” folder, you see a list of files in the folder, along with file slack.  File slack is the space between the end of a file and the end of the disk cluster in which it is stored. It’s common because data rarely fills clusters exactly, and residual data occur when a smaller file is written into the same cluster as a previous larger file, leaving potentially meaningful data.

You’ll also notice that some of the files have an “X” on them – these are files that have been deleted, but not overwritten.  So, with FTK Imager, you can not only view active data, you can also view inactive data in deleted files, file slack or unallocated space!  When you click on a file, you can view the bit-by-bit contents of the file in the lower right window.  You can also right-click on one or more files (or even an entire folder) to display a pop-up menu to enable you to export a copy of the file(s) out and review them with the native software.  You can also Add to Custom Content Image to begin compiling a list of files to put into an image, enabling you to selectively include specific files (instead of all of the files from the device) into the image file you create.

Next time, we’ll discuss Add to Custom Content Image in more detail and discuss creating the custom content image of specific files you select.

For more information, go to the Help menu to access the User Guide in PDF format.

So, what do you think?  Have you used FTK Imager as a mechanism for eDiscovery collection?  Please share any comments you might have or if you’d like to know more about a particular topic.

Disclaimer: The views represented herein are exclusively the views of the author, and do not necessarily represent the views held by CloudNine Discovery. eDiscoveryDaily is made available by CloudNine Discovery solely for educational purposes to provide general information about general eDiscovery principles and not to provide specific legal advice applicable to any particular circumstance. eDiscoveryDaily should not be used as a substitute for competent legal advice from a lawyer you have retained and who has agreed to represent you.
Defendant Compelled by Court to Produce Metadata – eDiscovery Case Law

Remember when we talked about the issue of metadata spoliation resulting from “drag and drop” to collect files?  Here’s a case where it appears that method may have been used, resulting in a judgment against the producing party.

In AtHome Care, Inc. v. The Evangelical Lutheran Good Samaritan Society, No. 1:12-cv-053-BLW (D. ID. Apr. 30, 2013), Idaho District Judge B. Lynn Winmill granted the plaintiff’s motion to compel documents, ordering the defendant to identify and produce metadata for the documents in this case.

In this pilot project contract dispute between two health care organizations, the plaintiff filed a motion to compel after failing to resolve some of the discovery disputes with the defendant “through meet and confers and informal mediation with the Court’s staff”.  One of the disputes was related to the omission of metadata in the defendant’s production.

Judge Winmill stated that “Although metadata is not addressed directly in the Federal Rules of Civil Procedure, it is subject to the same general rules of discovery…That means the discovery of metadata is also subject to the balancing test of Rule 26(b)(2)(C), which requires courts to weigh the probative value of proposed discovery against its potential burden.” {emphasis added}

“Courts typically order the production of metadata when it is sought in the initial document request and the producing party has not yet produced the documents in any form”, Judge Winmill continued, but noted that “there is no dispute that Good Samaritan essentially agreed to produce metadata, and would have produced the requested metadata but for an inadvertent change to the creation date on certain documents.”

The plaintiff claimed that the system metadata was relevant because its claims focused on the unauthorized use and misappropriation of its proprietary information and whether the defendant used the plaintiff’s proprietary information to create their own materials and model, contending “that the system metadata can answer the question of who received what information when and when documents were created”.  The defendant argued that the plaintiff “exaggerates the strength of its trade secret claim”.

Weighing the value against the burden of producing the metadata, Judge Winmill ruled that “The requested metadata ‘appears reasonably calculated to lead to the discovery of admissible evidence.’ Fed.R. Civ.P. 26(b)(1). Thus, it is discoverable.” {emphasis added}

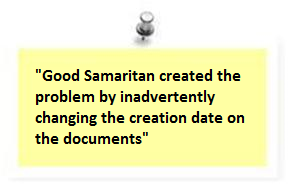
“The only question, then, is whether the burden of producing the metadata outweighs the benefit…As an initial matter, the Court must acknowledge that Good Samaritan created the problem by inadvertently changing the creation date on the documents. The Court does not find any degree of bad faith on the part of Good Samaritan — accidents happen — but this fact does weight in favor of requiring Good Samaritan to bear the burden of production…Moreover, the Court does not find the burden all that great.”

Therefore, the plaintiff’s motion to compel production of the metadata was granted.

So, what do you think?  Should a party be required to produce metadata?  Please share any comments you might have or if you’d like to know more about a particular topic.

Disclaimer: The views represented herein are exclusively the views of the author, and do not necessarily represent the views held by CloudNine Discovery. eDiscoveryDaily is made available by CloudNine Discovery solely for educational purposes to provide general information about general eDiscovery principles and not to provide specific legal advice applicable to any particular circumstance. eDiscoveryDaily should not be used as a substitute for competent legal advice from a lawyer you have retained and who has agreed to represent you.
How to Create an Image Using FTK Imager – eDiscovery Best Practices

A few days ago, we talked about the benefits and capabilities of Forensic Toolkit (FTK), which is a computer forensics software application provided by AccessData, as well as how to download your own free copy.  Now, let’s discuss how to create a disk image.

Before we begin, it’s important to note that best practices when creating a disk image includes the use of a write blocker.  Write blockers are devices that allow data to be acquired from a drive without creating the possibility of accidentally damaging the drive contents. They allow read commands to pass but block write commands, protecting the drive contents from being changed.  Tableau and FireFly are two examples of write blockers.

It’s also important to note that while we’re showing you how to “try this at home”, use of a certified forensic collection specialist is recommended when collecting data forensically that could require expert testimony on the collection process.

Create an Image Using FTK Imager

I’m going to create an image of one of my flash drives to illustrate the process.  To create an image, select Create Disk Image from the File menu.

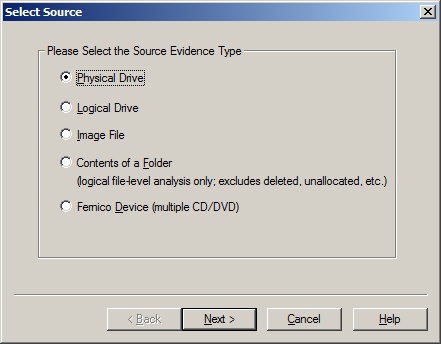
Source Evidence Type: To image an entire device, select Physical Drive (a physical device can contain more than one Logical Drive).  You can also create an image of an Image File, which seems silly, but it could be desirable if, say, you want to create a more compressed version of the image.  You can also image the specific Contents of a Folder or of a Femico Device (which is ideal for creating images of multiple CDs or DVDs with the same parameters).  In this example, we’ll select Physical Drive to create an image of the flash drive.

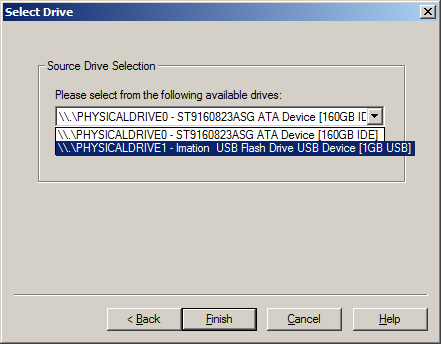
Source Drive Selection: Based on our selection of physical drive, we then have a choice of the current physical drives we can see, so we select the drive corresponding to the flash drive.

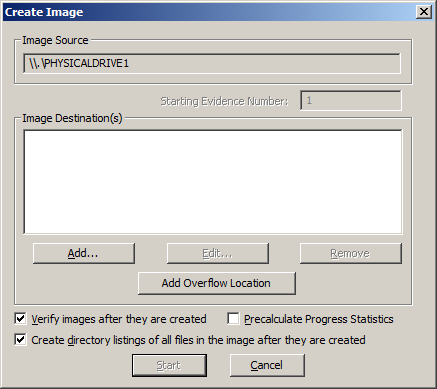
Create Image: Here is where you can specify where the image will be created.  We also always choose Verify images after they are created as a way to run a hash value check on the image file.  You can also Create directory listings of all files in the image after they are created, but be prepared that this will be a huge listing for a typical hard drive with hundreds of thousands of entries.

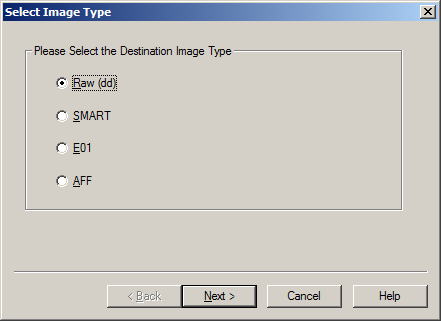
Select Image Type: This indicates the type of image file that will be created – Raw is a bit-by-bit uncompressed copy of the original, while the other three alternatives are designed for use with a specific forensics program.  We typically use Raw or E01, which is an EnCase forensic image file format.  In this example, we’re using Raw.

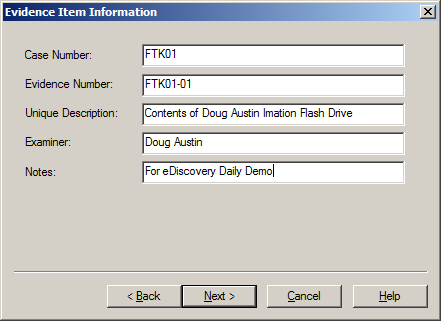
Evidence Item Information: This is where you can enter key information about the evidence item you are about to create to aid in documenting the item.  This information will be saved as part of the image summary information once the image is complete.

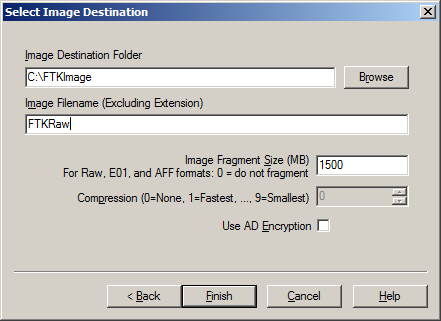
Select Image Destination: We’ll browse to a folder that I’ve created called “FTKImage” on the C: drive and give the image a file name.  Image Fragment Size indicates the size of each fragment when you want to break a larger image file into multiple parts.  Compression indicates the level of compression of the image file, from 0 (no compression) to 9 (maximum compression – and a slower image creation process).  For Raw uncompressed images, compression is always 0.  Use AD Encryption indicates whether to encrypt the image – we don’t typically select that, instead choosing to put an image on an encrypted drive (when encryption is desired).  Click Finish to begin the image process and a dialog will be displayed throughout the image creation process.  Because it is a bit-by-bit image of the device, it will take the same amount of time regardless of how many files are currently stored on the device.

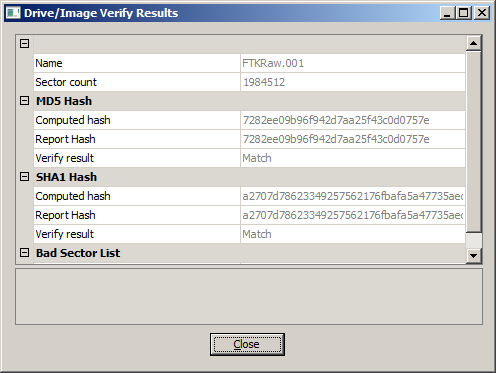
Drive/Image Verify Results: When the image is complete, this popup window will appear to show the name of the image file, the sector count, computed (before image creation) and reported (after image creation) MD5 and SHA1 hash values with a confirmation that they match and a list of bad sectors (if any).  The hash verification is a key check to ensure a valid image and the hash values should be the same regardless which image type you create.

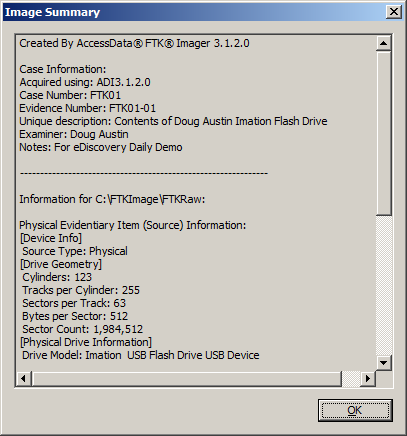
Image Summary: When the image is complete, click the Image Summary button to see the view a summary of the image that is created, including the evidence item information you entered, drive information, hash verification information, etc.  This information is also saved as a text file.

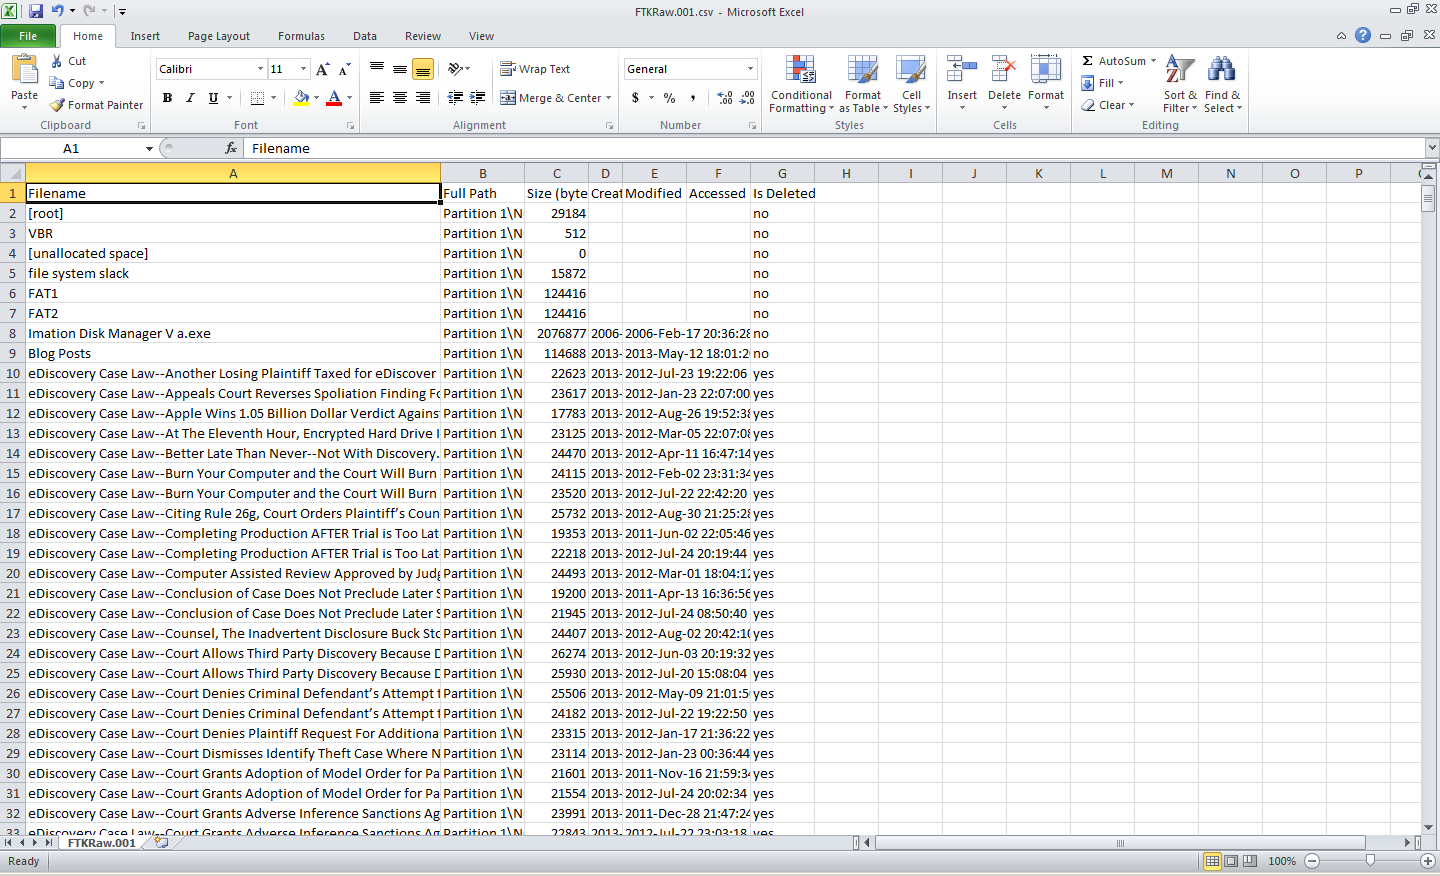
Directory Listing: If you selected Create directory listings of all files in the image, the results will be stored in a CSV file, which can be opened with Excel.

And, there you have it – a bit-by-bit image of the device!  You’ve just captured everything on the device, including deleted files and slack space data.  Next time, we’ll discuss Adding an Evidence Item to look at contents or drives or images (including the image we created here).

For more information, go to the Help menu to access the User Guide in PDF format.

So, what do you think?  Have you used FTK Imager as a mechanism for eDiscovery collection?  Please share any comments you might have or if you’d like to know more about a particular topic.

Disclaimer: The views represented herein are exclusively the views of the author, and do not necessarily represent the views held by CloudNine Discovery. eDiscoveryDaily is made available by CloudNine Discovery solely for educational purposes to provide general information about general eDiscovery principles and not to provide specific legal advice applicable to any particular circumstance. eDiscoveryDaily should not be used as a substitute for competent legal advice from a lawyer you have retained and who has agreed to represent you.
More Updates from the EDRM Annual Meeting – eDiscovery Trends

Yesterday, we discussed some general observations from the Annual Meeting for the Electronic Discovery Reference Model (EDRM) group and discussed some significant efforts and accomplishments by the (suddenly heavily talked about) EDRM Data Set project.  Here are some updates from other projects within EDRM.

It should be noted these are summary updates and that most of the focus on these updates is on accomplishments for the past year and deliverables that are imminent.  Over the next few weeks, eDiscovery Daily will cover each project in more depth with more details regarding planned activities for the coming year.

Model Code of Conduct (MCoC)

The MCoC was introduced in 2011 and became available for organizations to subscribe last year.  To learn more about the MCoC, you can read the code online here, or download it as a 22 page PDF file here.  Subscribing is easy!  To voluntarily subscribe to the MCoC, you can register on the EDRM website here.  Identify your organization, provide information for an authorized representative and answer four verification questions (truthfully, of course) to affirm your organization’s commitment to the spirit of the MCoC, and your organization is in!  You can also provide a logo for EDRM to include when adding you to the list of subscribing organizations.  Pending a survey of EDRM members to determine if any changes are needed, this project has been completed.  Team leaders include Eric Mandel of Zelle Hofmann, Kevin Esposito of Rivulex and Nancy Wallrich.

Information Governance Reference Model (IGRM)

The IGRM team has continued to make strides and improvements on an already terrific model.  Last October, they unveiled the release of version 3.0 of the IGRMAs their press release noted, “The updated model now includes privacy and security as primary functions and stakeholders in the effective governance of information.”  IGRM continues to be one of the most active and well participated EDRM projects.  This year, the early focus – as quoted from Judge Andrew Peck’s keynote speech at Legal Tech this past year – is “getting rid of the junk”.  Project leaders are Aliye Ergulen from IBM, Reed Irvin from Viewpointe and Marcus Ledergerber from Morgan Lewis.

Search

One of the best examples of the new, more agile process for creating deliverables within EDRM comes from the Search team, which released its new draft Computer Assisted Review Reference Model (CARRM), which depicts the flow for a successful Computer Assisted Review project. The entire model was created in only a matter of weeks.  Early focus for the Search project for the coming year includes adjustments to CARRM (based on feedback at the annual meeting).  You can also still send your comments regarding the model to mail@edrm.net or post them on the EDRM site here.  A webinar regarding CARRM is also planned for late July.  Kudos to the Search team, including project leaders Dominic Brown of Autonomy and also Jay Lieb of kCura, who got unmerciful ribbing for insisting (jokingly, I think) that TIFF files, unlike Generalissimo Francisco Franco, are still alive.  🙂

Jobs

In late January, the Jobs Project announced the release of the EDRM Talent Task Matrix diagram and spreadsheet, which is available in XLSX or PDF format. As noted in their press release, the Matrix is a tool designed to help hiring managers better understand the responsibilities associated with common eDiscovery roles. The Matrix maps responsibilities to the EDRM framework, so eDiscovery duties associated can be assigned to the appropriate parties.  Project leader Keith Tom noted that next steps include surveying EDRM members regarding the Matrix, requesting and co-authoring case-studies and white papers, and creating a short video on how to use the Matrix.

Metrics

In today’s session, the Metrics project team unveiled the first draft of the new Metrics model to EDRM participants!  Feedback was provided during the session and the team will make the model available for additional comments from EDRM members over the next week or so, with a goal of publishing for public comments in the next two to three weeks.  The team is also working to create a page to collect Metrics measurement tools from eDiscovery professionals that can benefit the eDiscovery community as a whole.  Project leaders Dera Nevin of TD Bank and Kevin Clark noted that June is “budget calculator month”.

Other Initiatives

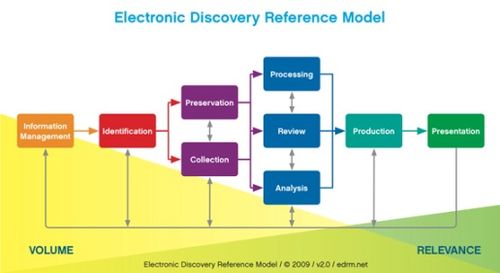
As noted yesterday, there is a new project to address standards for working with native files in the different EDRM phases led by Eric Mandel from Zelle Hofmann and also a new initiative to establish collection guidelines, spearheaded by Julie Brown from Vorys.  There is also an effort underway to refocus the XML project, as it works to complete the 2.0 version of the EDRM XML model.  In addition, there was quite a spirited discussion as to where EDRM is heading as it approaches ten years of existence and it will be interesting to see how the EDRM group continues to evolve over the next year or so.  As you can see, a lot is happening within the EDRM group – there’s a lot more to it than just the base Electronic Discovery Reference Model.

So, what do you think?  Are you a member of EDRM?  If not, why not?  Please share any comments you might have or if you’d like to know more about a particular topic.

Disclaimer: The views represented herein are exclusively the views of the author, and do not necessarily represent the views held by CloudNine Discovery. eDiscoveryDaily is made available by CloudNine Discovery solely for educational purposes to provide general information about general eDiscovery principles and not to provide specific legal advice applicable to any particular circumstance. eDiscoveryDaily should not be used as a substitute for competent legal advice from a lawyer you have retained and who has agreed to represent you.
Reporting from the EDRM Annual Meeting and a Data Set Update – eDiscovery Trends

The Electronic Discovery Reference Model (EDRM) Project was created in May 2005 by George Socha of Socha Consulting LLC and Tom Gelbmann of Gelbmann & Associates to address the lack of standards and guidelines in the electronic discovery market.  Now, beginning its ninth year of operation with its annual meeting in St. Paul, MN, EDRM is accomplishing more than ever to address those needs.  Here are some highlights from the meeting, and an update regarding the (suddenly heavily talked about) EDRM Data Set project.

Annual Meeting

Twice a year, in May and October, eDiscovery professionals who are EDRM members meet to continue the process of working together on various standards projects.  This will be my eighth year participating in EDRM at some level and, oddly enough, I’m assisting with PR and promotion (how am I doing so far?).  eDiscovery Daily has referenced EDRM and its phases many times in the 2 1/2 years plus history of the blog – this is our 144th post that relates to EDRM!

Some notable observations about today’s meeting:

  • New Participants: More than half the attendees at this year’s annual meeting are attending for the first time.  EDRM is not just a core group of “die-hards”, it continues to find appeal with eDiscovery professionals throughout the industry.
  • Agile Approach: EDRM has adopted an Agile approach to shorten the time to complete and publish deliverables, a change in philosophy that facilitated several notable accomplishments from working groups over the past year including the Model Code of Conduct (MCoC), Information Governance Reference Model (IGRM), Search and Jobs (among others).  More on that tomorrow.
  • Educational Alliances: For the first time, EDRM has formed some interesting and unique educational alliances.  In April, EDRM teamed with the University of Florida Levin College of Law to present a day and a half conference entitled E-Discovery for the Small and Medium Case.  And, this June, EDRM will team with Bryan University to provide an in-depth, four-week E-Discovery Software & Applied Skills Summer Immersion Program for Law School Students.
  • New Working Group: A new working group to be lead by Eric Mandel of Zelle Hoffman was formed to address standards for working with native files in the different EDRM phases.

Tomorrow, we’ll discuss the highlights for most of the individual working groups.  Given the recent amount of discussion about the EDRM Data Set group, we’ll start with that one today!

Data Set

The EDRM Enron Data Set has been around for several years and has been a valuable resource for eDiscovery software demonstration and testing (we covered it here back in January 2011).  The data in the EDRM Enron PST Data Set files is sourced from the FERC Enron Investigation release made available by Lockheed Martin Corporation.  It was reconstituted as PST files with attachments for the EDRM Data Set Project.  So, in essence EDRM took already public domain available data and made the data much more usable.  Initially, the data was made available for download on the EDRM site, then subsequently moved to Amazon Web Services (AWS).

In the past several days, there has been much discussion about the personally-identifiable information (“PII”) available within the FERC (and consequently the EDRM Data Set), including social security numbers, credit card numbers, dates of birth, home addresses and phone numbers.  Consequently, the EDRM Data Set has been taken down from the AWS site.

The Data Set team led by Michael Lappin of Nuix and Eric Robi of Elluma Discovery has been working on a process (using predictive coding technology) to identify and remove the PII data from the EDRM Data Set.  Discussions about this process began months ago, prior to the recent discussions about the PII data contained within the set.  The team has completed this iterative process for V1 of the data set (which contains 1,317,158 items), identifying and removing 10,568 items with PII, HIPAA and other sensitive information.  This version of the data set will be made available within the EDRM community shortly for peer review testing.  The data set team will then repeat the process for the larger V2 version of the data set (2,287,984 items).  A timetable for republishing both sets should be available soon and the efforts of the Data Set team on this project should pay dividends in developing and standardizing processes for identifying and eliminating sensitive data that eDiscovery professionals can use in their own data sets.

The team has also implemented a Forensic Files Testing Project site where users can upload their own “modern”, non-copyrighted file samples that are typically encountered during electronic discovery processing to provide a more diverse set of data than is currently available within the Enron data set.

So, what do you think?  How has EDRM impacted how you manage eDiscovery?  Please share any comments you might have or if you’d like to know more about a particular topic.

Disclaimer: The views represented herein are exclusively the views of the author, and do not necessarily represent the views held by CloudNine Discovery. eDiscoveryDaily is made available by CloudNine Discovery solely for educational purposes to provide general information about general eDiscovery principles and not to provide specific legal advice applicable to any particular circumstance. eDiscoveryDaily should not be used as a substitute for competent legal advice from a lawyer you have retained and who has agreed to represent you.