Spoliation

Spoliation of Data Can Get You Sent Up the River – eDiscovery Case Law

Sometimes, eDiscovery can literally be a fishing expedition.

I got a kick out of Ralph Losey’s article on E-Discovery Law Today (Fishing Expedition Discovers Laptop Cast into Indian River) where the defendant employee in a RICO case in Simon Property Group, Inc. v. Lauria, 2012 U.S. Dist. LEXIS 184638 (M.D. Fla. 2012) threw her laptop into a river.  Needless to say, given the intentional spoliation of evidence, the court imposed struck all of the defenses raised by the defendant and scheduled the case for trial on the issue of damages.  Magistrate Judge Karla Spaulding summarized the defendant’s actions in the ruling:

“This case has all the elements of a made-for-TV movie: A company vice president surreptitiously awards lucrative business deals to a series of entities that she and her immediate family members control. To cover up the egregious self-dealing, she fabricates multiple fictitious personas and then uses those fictitious personas to “communicate” with her employer on behalf of the entities she controls. She also cut-and-pastes her supervisor’s signature onto service agreements in an attempt to make it seem as if her activities have been approved. After several years, a whistleblower exposes the scheme to the company. The company then tells the vice president that she is being investigated and warns her not to destroy any documents or evidence. Sensing that her scheme is about to collapse around her and wanting to cover her tracks, the vice president then travels to the East Coast of Florida and throws her laptop computer containing information about these activities into a river.”

At least she didn’t deny it when deposed as noted in the ruling:

“When asked why she threw the laptop away, Lauria testified as follows:

Q: Okay. Why did you throw the laptop away?

A: Because I knew that something was coming down and I just didn’t want all the stuff around.

Q: So you were trying to get rid of documentation and e-mails and things?

A: Uh-huh, yes.

Q: That directly related to the lawsuit?

A: Yes. Now, they do, yes.”

Maybe she should have used the George Costanza excuse and state that she didn’t know it was “frowned upon”.

So, what do you think?  Was that wrong?  Just kidding.  Please share any comments you might have or if you’d like to know more about a particular topic.

BTW, Ralph is no stranger to this blog – in addition to several of his articles we’ve referenced, we’ve also conducted thought leader interviews with him at LegalTech New York the past two years.  Here’s a link if you want to check those out.

Disclaimer: The views represented herein are exclusively the views of the author, and do not necessarily represent the views held by CloudNine Discovery. eDiscoveryDaily is made available by CloudNine Discovery solely for educational purposes to provide general information about general eDiscovery principles and not to provide specific legal advice applicable to any particular circumstance. eDiscoveryDaily should not be used as a substitute for competent legal advice from a lawyer you have retained and who has agreed to represent you.


Adverse Inference Sanction for Defendant who Failed to Stop Automatic Deletion – eDiscovery Case Law

Remember the adverse inference instructions in the Zubulake v. UBS Warburg and Apple v. Samsung cases?  This case has characteristics of both of those.

In Pillay v. Millard Refrigerated Servs., Inc., No. 09 C 5725 (N.D. Ill. May 22, 2013), Illinois District Judge Joan H. Lefkow granted the plaintiff’s motion for an adverse inference jury instruction due to the defendant’s failure to stop automatic deletion of employee productivity tracking data used as a reason for terminating a disabled employee.

Case Background

The plaintiff alleged that the defendant is liable for retaliation under the Americans with Disabilities Act (“ADA”) for terminating his employment after the plaintiff opposed the defendant’s decision to terminate another employee because of a perceived disability.  The defendant employed a labor management system (“LMS”) to track its warehouse employees’ productivity and performance.  Shortly after hiring the employee and telling him that his LMS numbers were great, the defendant fired the employee when it was determined that a prior work injury he suffered rendered him with a disability rating of 17.5 percent by the Illinois Industrial Commission, which prompted the senior vice president to send an email to the general manager stating “We have this all documented right? … Let’s get him out asap.”  The employee (and the plaintiff, for objecting to the termination) was terminated in August 2008 and the defendant contended that the employee’s termination resulted from his unacceptable LMS performance rating of 59 percent.

Deletion of LMS Data

In August 2009, the raw data used to create the employee’s LMS numbers were deleted because the LMS software automatically deleted the underlying data after a year. Before the information was deleted, the plaintiff and other terminated employee provided several notices of the duty to preserve this information, including:

  • A demand letter from the plaintiff in September 2008;
  • Preservation notices from the plaintiff and other terminated employee in December 2008 reminding the defendant of its obligations to preserve evidence;
  • Charges filed by both terminated employees with the Equal Employment Opportunity Commission (“EEOC”) in January 2009.

Also, the defendant’s 30(b)(6) witness testified that supervisors could lower an LMS performance rating by deleting the underlying data showing that an employee worked a certain number of jobs for a given period of time, which the plaintiff contended happened in this case.  As a result, the plaintiff filed a motion for the adverse inference jury instruction.

Judge’s Ruling

Noting that the defendant “relied on this information when responding to the EEOC charges, which occurred before the deletion of the underlying LMS data” and that “[i]nformation regarding the underlying LMS data would have been discoverable to challenge Millard’s explanation for Ramirez’s termination”, Judge Lefkow found that the defendant had a duty to preserve the LMS data (“A party must preserve evidence that it has notice is reasonably likely to be the subject of a discovery request, even before a request is actually received.”).

With regard to the defendant’s culpability in deleting the data, Judge Lefkow stated “[t]hat Millard knew about the pending lawsuit and that the underlying LMS data would be deleted but failed to preserve the information was objectively unreasonable. Accordingly, even without a finding of bad faith, the court may craft a proper sanction based on Millard’s failure to preserve the underlying LMS data.”

So, Judge Lefkow granted the plaintiff’s request for an adverse inference sanction with the following instruction to be given to the jury:

“Pillay contends that Millard at one time possessed data documenting Ramirez’s productivity and performance that was destroyed by Millard. Millard contends that the loss of the data was accidental. You may assume that such evidence would have been unfavorable to Millard only if you find by a preponderance of the evidence that (1) Millard intentionally or recklessly caused the evidence to be destroyed; and (2) Millard caused the evidence to be destroyed in bad faith.”

So, what do you think?  Should the adverse inference sanction have been awarded?  Please share any comments you might have or if you’d like to know more about a particular topic.

Disclaimer: The views represented herein are exclusively the views of the author, and do not necessarily represent the views held by CloudNine Discovery. eDiscoveryDaily is made available by CloudNine Discovery solely for educational purposes to provide general information about general eDiscovery principles and not to provide specific legal advice applicable to any particular circumstance. eDiscoveryDaily should not be used as a substitute for competent legal advice from a lawyer you have retained and who has agreed to represent you.

Capturing Memory and Obtaining Protected Files with FTK Imager – eDiscovery Best Practices

Over the past few weeks, we have talked about the benefits and capabilities of Forensic Toolkit (FTK) Imager from AccessData (and obtaining your own free copy), how to create a disk image, how to add evidence items for the purpose of reviewing the contents of those evidence items (such as physical drives or images that you’ve created) and how to export files and create a custom content image of a targeted collection of files with FTK Imager.  This week, let’s discuss how to Capture Memory and Obtain Protected Files to collect a user’s account information and possible passwords to other files.

Capture Memory

If you’re trying to access the contents of memory from an existing system that’s running, you can use a runtime version of FTK Imager from a flash drive to access that memory.  From the File menu, you can select Capture Memory to capture data stored in memory within the system.

Capturing memory can be useful for a number of reasons.  For example, if TrueCrypt is running to encrypt the contents of the drive, the password could be stored in memory – if it is, Capture Memory enables you to capture the contents of memory (including the password) before it is lost.

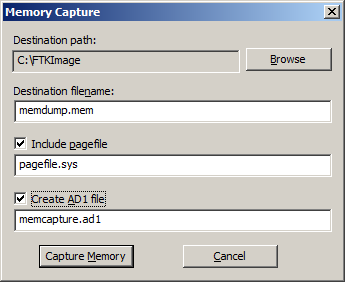
Simply specify the destination path and filename to capture memory to the specified file.  You can also include the contents of pagefile.sys, which is a Windows system file that acts as a swap file for memory; hence, it can contain useful memory information as well.  Creating an AD1 file enables you to create an AD1 image of the memory contents – then you can add it as an evidence item to review the contents.

Obtain Protected Files

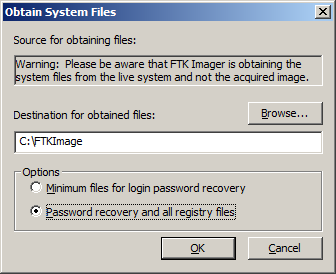
Because Windows does not allow you to copy or save live Registry files, you would have to image the hard drive and then extract the Registry files, or boot the computer from a boot disk and copy the Registry files from the inactive operating system on the drive. From the File menu, you can select Obtain Protected Files to circumvent the Windows operating system and its file locks, thus allowing you to copy the live Registry files.  If the user allows Windows to remember his or her passwords, that information can be stored within the registry files.

Specify the destination path for the obtained files, then select the option for which files you would like to obtain.  The Minimum files for login recovery option retrieves Users, System, and SAM files from which you can recover a user’s account information.  The Password recovery and all Registry files option is more comprehensive, retrieving Users, System, SAM, NTUSER.DAT, Default, Security, Software, and Userdiff files from which you can recover account information and possible passwords to other files, so it’s the one we tend to use.

For more information, go to the Help menu to access the User Guide in PDF format.

So, what do you think?  Have you used FTK Imager as a mechanism for eDiscovery collection?  Please share any comments you might have or if you’d like to know more about a particular topic.

Disclaimer: The views represented herein are exclusively the views of the author, and do not necessarily represent the views held by CloudNine Discovery. eDiscoveryDaily is made available by CloudNine Discovery solely for educational purposes to provide general information about general eDiscovery principles and not to provide specific legal advice applicable to any particular circumstance. eDiscoveryDaily should not be used as a substitute for competent legal advice from a lawyer you have retained and who has agreed to represent you.
Appellate Court Upholds District Court Discretion for Determining the Strength of Adverse Inference Sanction – eDiscovery Case Law

In Flagg v. City of Detroit, No. 11-2501, 2013 U.S. App. (6th Cir. Apr. 25, 2013), the Sixth Circuit held that the district court did not abuse its discretion in issuing a permissive rather than mandatory adverse inference instruction for the defendant’s deletion of emails, noting that the district court has discretion in determining the strength of the inference to be applied.

In this appeal, the plaintiff children of a murder victim argued that the district court did not go far enough in issuing a permissive adverse inference instruction against the defendants for the destruction of evidence; instead, they believed a mandatory adverse inference instruction was warranted.

During discovery, the plaintiffs had filed a motion for preservation of evidence that covered emails. The court granted the motion. Later, the plaintiffs asked the defendants to produce all emails for a number of city officials, including the mayor. However, the city had deleted and purged the email of several officials when they resigned, including those of the mayor. The district court found the city had acted “culpably and in bad faith” in destroying the emails. Though it denied the plaintiffs’ request for a default judgment and a mandatory adverse inference, it did grant their request for a permissive inference. The plaintiffs appealed the district court’s choice of sanction.

The Sixth Circuit reviewed the district court’s opinion for abuse of discretion. It found that the plaintiffs met all three elements required for an adverse inference instruction: that the defendants had an obligation to preserve the evidence they destroyed, that the defendants destroyed the evidence with a culpable state of mind, and that the destroyed evidence was relevant to the plaintiffs’ claim.

Because the district court has the power to decide the strength of the inference, the Sixth Circuit upheld its decision, despite noting that “[i]f the severity of a spoliation sanction were required to be based solely on the sanctioned party’s degree of fault, this Court likely would be compelled to agree with Plaintiffs that the district court abused its discretion. After all, ‘intentionality’ is the highest degree of fault contemplated by this Court . . . and the district court found it to be present in this case.”

So, what do you think?  Should the District Court decision have been upheld?  Please share any comments you might have or if you’d like to know more about a particular topic.

Case Summary Source: Applied Discovery (free subscription required).  For eDiscovery news and best practices, check out the Applied Discovery Blog here.

Disclaimer: The views represented herein are exclusively the views of the author, and do not necessarily represent the views held by CloudNine Discovery. eDiscoveryDaily is made available by CloudNine Discovery solely for educational purposes to provide general information about general eDiscovery principles and not to provide specific legal advice applicable to any particular circumstance. eDiscoveryDaily should not be used as a substitute for competent legal advice from a lawyer you have retained and who has agreed to represent you.
Changes to Federal eDiscovery Rules Are One Step Closer – eDiscovery Trends

In April, we referenced Henry Kelston’s report in Law Technology News that another major set of amendments to the discovery provisions of the Federal Rules of Civil Procedure is getting closer and could be adopted within the year.  Now, the amendments are one step closer to enactment as they have been approved for public comment.

Henry Kelston reports again in Law Technology News (Proposed Discovery Amendments Move to Public Comment), noting that “With minimal discussion and no significant dissent, the Judicial Conference of the United States’ Standing Committee on Rules of Practice and Procedure voted on June 3 to approve for public comment the full slate of proposed amendments” that was previously approved by its Advisory Committee on Civil Rules.

As we summarized previously, potential revisions that have impact to discovery include changes to Rules 26, 30, 31, 33, 34, 36 and 37.  As Kelston reports, “The package also includes changes to Rule 1, adding language to the text to emphasize that the responsibility to use the rules in order ‘to secure the just, speedy and inexpensive determination of every action’ lies with the parties as well as the courts, and inserting comment language to encourage cooperation among parties in applying the rules.”

Apparently, Rule 1 was the only rule to receive votes against it as it received three dissenting votes.  Nonetheless, the proposed amendments were voted on as a package by the standing committee, who voted unanimously in favor of approving the package for publication.

After anticipated publication for public comment later this summer, the public comment period for proposed rules is expected to last six months.  Kelston reports that the “advisory committee, anticipating a high level of public interest in the proposals, plans to hold public hearings in several cities around the U.S.”, with the first hearing “expected to being held in November in Washington, D.C., to coincide with the advisory committee’s next scheduled meeting.”

We’ll keep you posted as the amendments progress.

So, what do you think?  Are you pleased or concerned with the proposed amendments?  Please share any comments you might have or if you’d like to know more about a particular topic.

Disclaimer: The views represented herein are exclusively the views of the author, and do not necessarily represent the views held by CloudNine Discovery. eDiscoveryDaily is made available by CloudNine Discovery solely for educational purposes to provide general information about general eDiscovery principles and not to provide specific legal advice applicable to any particular circumstance. eDiscoveryDaily should not be used as a substitute for competent legal advice from a lawyer you have retained and who has agreed to represent you.

Export Files and Custom Content Images in FTK Imager – eDiscovery Best Practices

Over the past few weeks, we have talked about the benefits and capabilities of Forensic Toolkit (FTK) Imager from AccessData (and obtaining your own free copy), how to create a disk image and how to add evidence items with FTK Imager for the purpose of reviewing the contents of evidence items, such as physical drives or images that you’ve created.  This week, let’s discuss how to export files and how to create a custom content image of a targeted collection of files.

Sometimes, you don’t want to create an image of the entire drive; instead, you’d like to perform a targeted collection or export individual files to review them.  Let’s discuss how to do that.

Export Files

As we discussed last time, you can Add Evidence Item to add a single evidence item to the evidence tree.  You can select a Physical Drive or Logical Drive, an Image File to view an image file created before or Contents of a Folder, to look at a specific folder.  You can also Add All Attached Devices to add all of the attached physical and logical devices.  When you select one or more evidence items, the selected items will be displayed in the Evidence Tree on the left hand side; navigate to the folder you want and it will display the contents on the right hand side.

Select one or more files (use Ctrl+Click to select multiple files or Shift+Click to select a range of files), then right-click on one of the files to display a popup menu.

Select Export Files to export the selected files, then FTK Imager will prompt you for a folder where the files will be saved.  The files will be saved to that folder.  Exporting files can be useful to pull a copy of selected files out of a forensic image for review.

Create Custom Content Image

As you’ll notice in the previous section, when you display the popup menu, another choice is to Add to Custom Content Image (AD1).  This enables you to start building a targeted list of files to be included in a custom image – useful if you want a specific group of files and not everything on the evidence item.

Any files that you select will then be added to the Custom Content Sources pane in the lower left window.  Continue adding items by repeating this step until you’ve specified or selected all the evidence files you want to add to this Custom Content image.  You can also use the Edit button to open the Wild Card Options dialog and select all files that meet a certain criteria (e.g., “My Documents|*.doc” will collect all files with a .doc extension in any folder named My Documents).

Once you have built your desired list of files, you can then build your Custom Content Image.  Select Create Custom Content Image from the file menu.  You can then repeat the steps for the Create Image, Evidence Item Information, Select Image Destination, Drive/Image Verify Results and Image Summary forms as illustrated in our earlier post How to Create an Image Using FTK Imager.  The resulting image will have an AD1 extension.  Then, this image can be examined just like any other image.

For more information, go to the Help menu to access the User Guide in PDF format.

Next time, we will discuss how to Obtain Protected Files to collect a user’s account information and possible passwords to other files.

So, what do you think?  Have you used FTK Imager as a mechanism for eDiscovery collection?  Please share any comments you might have or if you’d like to know more about a particular topic.

Disclaimer: The views represented herein are exclusively the views of the author, and do not necessarily represent the views held by CloudNine Discovery. eDiscoveryDaily is made available by CloudNine Discovery solely for educational purposes to provide general information about general eDiscovery principles and not to provide specific legal advice applicable to any particular circumstance. eDiscoveryDaily should not be used as a substitute for competent legal advice from a lawyer you have retained and who has agreed to represent you.
Adding Evidence Items with FTK Imager – eDiscovery Best Practices

A couple of weeks ago, we talked about the benefits and capabilities of Forensic Toolkit (FTK) Imager, which is a computer forensics software application provided by AccessData, as well as how to download your own free copy.  Then, last week, we discussed how to create a disk image.  This week, let’s discuss how to add evidence items with FTK Imager for the purpose of reviewing the contents of evidence items, such as physical drives or images that you’ve created.

Adding Evidence Items Using FTK Imager

Last week, I created an image of one of my flash drives to illustrate the process of creating an image.  Let’s take a look at that image as an evidence item.

From the File menu, you can select Add Evidence Item to add a single evidence item to the evidence tree.  You can also select Add All Attached Devices to add all of the attached physical and logical devices (If no media is present in an attached device such as a CD- or DVD-ROM or a DVD-RW, the device is skipped).  In this case we’ll add a single evidence item.

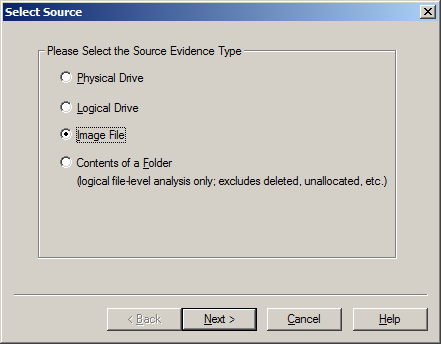
Source Evidence Type: The first step is to identify the source type that you want to review.  You can select Physical Drive or Logical Drive (as we noted before, a physical device can contain more than one logical drive).  You can also select an Image File to view an image file you created before or Contents of a Folder, to look at a specific folder.  In this example, we’ll select Image File to view the image of the flash drive we created and locate the source path of the image file.

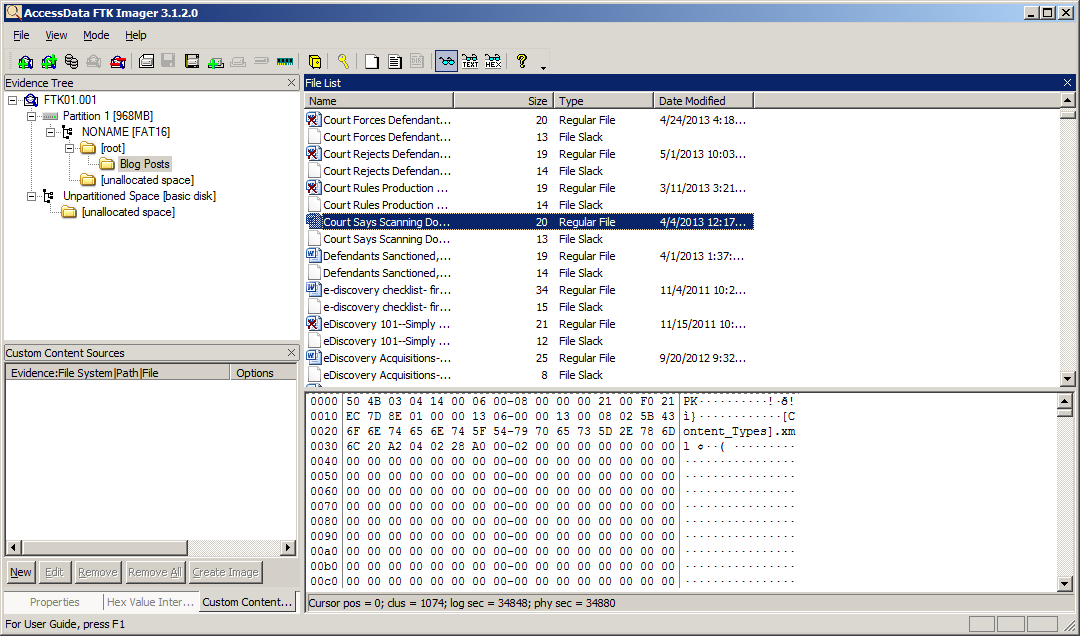
The evidence tree will then display the item – you can keep adding evidence items if you want to look at more than one at once.  The top node is the selected item, from which you can drill down to the contents of the item.  This includes partitions and unpartitioned space, folders from the root folder on down and unallocated space, which could contain recoverable data.  Looking at the “Blog Posts” folder, you see a list of files in the folder, along with file slack.  File slack is the space between the end of a file and the end of the disk cluster in which it is stored. It’s common because data rarely fills clusters exactly, and residual data occur when a smaller file is written into the same cluster as a previous larger file, leaving potentially meaningful data.

You’ll also notice that some of the files have an “X” on them – these are files that have been deleted, but not overwritten.  So, with FTK Imager, you can not only view active data, you can also view inactive data in deleted files, file slack or unallocated space!  When you click on a file, you can view the bit-by-bit contents of the file in the lower right window.  You can also right-click on one or more files (or even an entire folder) to display a pop-up menu to enable you to export a copy of the file(s) out and review them with the native software.  You can also Add to Custom Content Image to begin compiling a list of files to put into an image, enabling you to selectively include specific files (instead of all of the files from the device) into the image file you create.

Next time, we’ll discuss Add to Custom Content Image in more detail and discuss creating the custom content image of specific files you select.

For more information, go to the Help menu to access the User Guide in PDF format.

So, what do you think?  Have you used FTK Imager as a mechanism for eDiscovery collection?  Please share any comments you might have or if you’d like to know more about a particular topic.

Disclaimer: The views represented herein are exclusively the views of the author, and do not necessarily represent the views held by CloudNine Discovery. eDiscoveryDaily is made available by CloudNine Discovery solely for educational purposes to provide general information about general eDiscovery principles and not to provide specific legal advice applicable to any particular circumstance. eDiscoveryDaily should not be used as a substitute for competent legal advice from a lawyer you have retained and who has agreed to represent you.
How to Create an Image Using FTK Imager – eDiscovery Best Practices

A few days ago, we talked about the benefits and capabilities of Forensic Toolkit (FTK), which is a computer forensics software application provided by AccessData, as well as how to download your own free copy.  Now, let’s discuss how to create a disk image.

Before we begin, it’s important to note that best practices when creating a disk image includes the use of a write blocker.  Write blockers are devices that allow data to be acquired from a drive without creating the possibility of accidentally damaging the drive contents. They allow read commands to pass but block write commands, protecting the drive contents from being changed.  Tableau and FireFly are two examples of write blockers.

It’s also important to note that while we’re showing you how to “try this at home”, use of a certified forensic collection specialist is recommended when collecting data forensically that could require expert testimony on the collection process.

Create an Image Using FTK Imager

I’m going to create an image of one of my flash drives to illustrate the process.  To create an image, select Create Disk Image from the File menu.

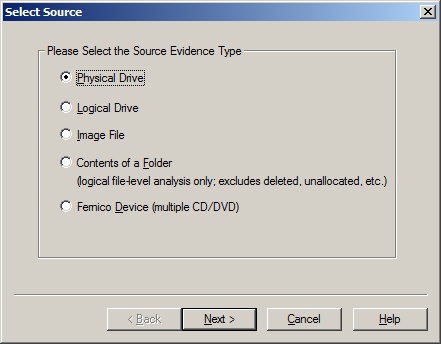
Source Evidence Type: To image an entire device, select Physical Drive (a physical device can contain more than one Logical Drive).  You can also create an image of an Image File, which seems silly, but it could be desirable if, say, you want to create a more compressed version of the image.  You can also image the specific Contents of a Folder or of a Femico Device (which is ideal for creating images of multiple CDs or DVDs with the same parameters).  In this example, we’ll select Physical Drive to create an image of the flash drive.

Source Drive Selection: Based on our selection of physical drive, we then have a choice of the current physical drives we can see, so we select the drive corresponding to the flash drive.

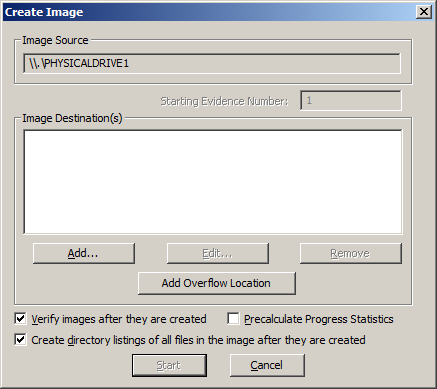
Create Image: Here is where you can specify where the image will be created.  We also always choose Verify images after they are created as a way to run a hash value check on the image file.  You can also Create directory listings of all files in the image after they are created, but be prepared that this will be a huge listing for a typical hard drive with hundreds of thousands of entries.

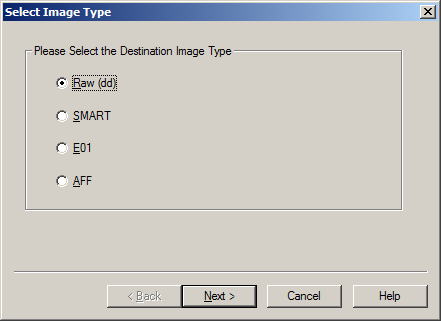
Select Image Type: This indicates the type of image file that will be created – Raw is a bit-by-bit uncompressed copy of the original, while the other three alternatives are designed for use with a specific forensics program.  We typically use Raw or E01, which is an EnCase forensic image file format.  In this example, we’re using Raw.

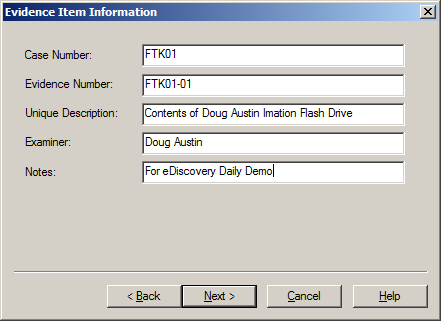
Evidence Item Information: This is where you can enter key information about the evidence item you are about to create to aid in documenting the item.  This information will be saved as part of the image summary information once the image is complete.

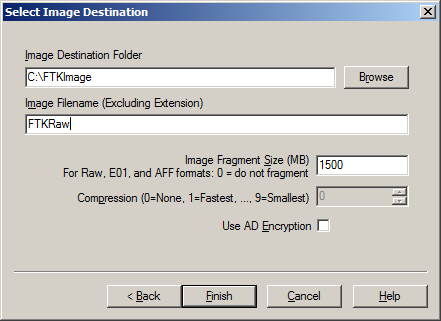
Select Image Destination: We’ll browse to a folder that I’ve created called “FTKImage” on the C: drive and give the image a file name.  Image Fragment Size indicates the size of each fragment when you want to break a larger image file into multiple parts.  Compression indicates the level of compression of the image file, from 0 (no compression) to 9 (maximum compression – and a slower image creation process).  For Raw uncompressed images, compression is always 0.  Use AD Encryption indicates whether to encrypt the image – we don’t typically select that, instead choosing to put an image on an encrypted drive (when encryption is desired).  Click Finish to begin the image process and a dialog will be displayed throughout the image creation process.  Because it is a bit-by-bit image of the device, it will take the same amount of time regardless of how many files are currently stored on the device.

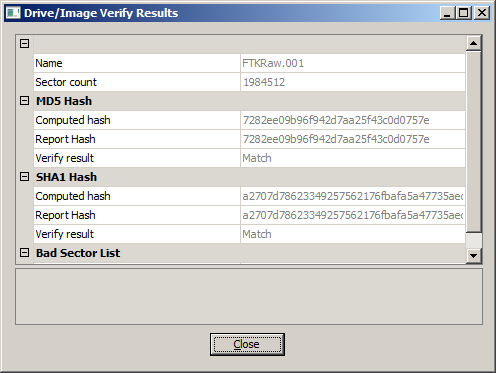
Drive/Image Verify Results: When the image is complete, this popup window will appear to show the name of the image file, the sector count, computed (before image creation) and reported (after image creation) MD5 and SHA1 hash values with a confirmation that they match and a list of bad sectors (if any).  The hash verification is a key check to ensure a valid image and the hash values should be the same regardless which image type you create.

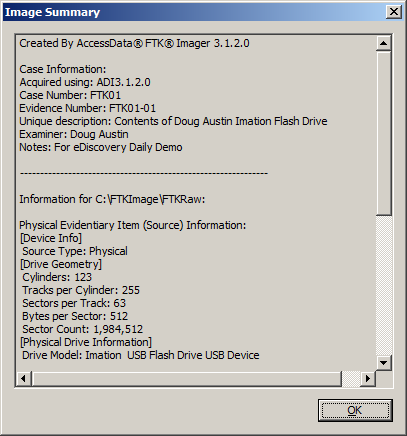
Image Summary: When the image is complete, click the Image Summary button to see the view a summary of the image that is created, including the evidence item information you entered, drive information, hash verification information, etc.  This information is also saved as a text file.

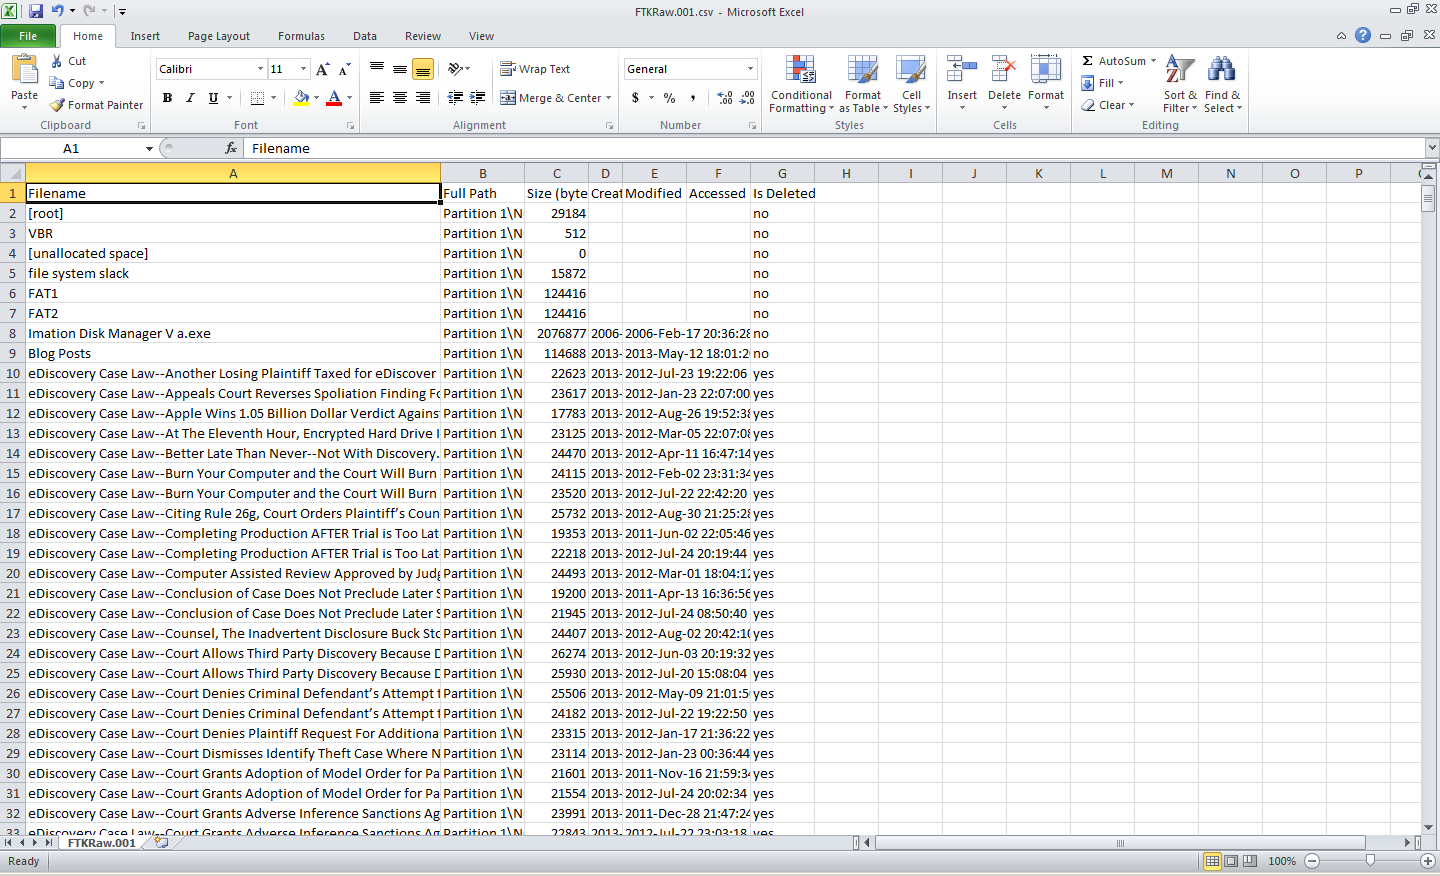
Directory Listing: If you selected Create directory listings of all files in the image, the results will be stored in a CSV file, which can be opened with Excel.

And, there you have it – a bit-by-bit image of the device!  You’ve just captured everything on the device, including deleted files and slack space data.  Next time, we’ll discuss Adding an Evidence Item to look at contents or drives or images (including the image we created here).

For more information, go to the Help menu to access the User Guide in PDF format.

So, what do you think?  Have you used FTK Imager as a mechanism for eDiscovery collection?  Please share any comments you might have or if you’d like to know more about a particular topic.

Disclaimer: The views represented herein are exclusively the views of the author, and do not necessarily represent the views held by CloudNine Discovery. eDiscoveryDaily is made available by CloudNine Discovery solely for educational purposes to provide general information about general eDiscovery principles and not to provide specific legal advice applicable to any particular circumstance. eDiscoveryDaily should not be used as a substitute for competent legal advice from a lawyer you have retained and who has agreed to represent you.
When Lawyers Get Sued, They Have Preservation Obligations Too – eDiscovery Case Law

In Distefano v. Law Offices of Barbara H. Katsos, PC., No. CV 11-2893 (JS) (AKT) (D. ED NY Mar. 29, 2013), New York Magistrate Judge A. Kathleen Tomlinson found that the defendant (an attorney who was being sued by the plaintiff she previously represented for breach of contract, negligence/legal malpractice, and breach of fiduciary duty/duty of care) had a duty to preserve information from a discarded computer and ordered a hearing for the defendant to address a number of questions to determine the potential relevance of the destroyed data and whether the defendant had a sufficiently culpable state of mind.

The plaintiff alleged professional negligence by the defendant related to her representation of his franchise business for Cold Stone Creamery stores.  During a Discovery Status Conference, it was revealed that the defendant had gotten rid of her computer before the litigation began, as she noted in her affidavit that she was advised by a third-party individual who fixed her office computers that they could not be repaired.  As she used AOL for email correspondence, she contacted AOL “to inquire if emails from several years ago could be recovered by AOL”, but was told that they “could not recover emails from several years ago for the stated email address”.  After receiving the defendant’s affidavit, the plaintiff filed a motion for spoliation.

With regard to the defendant’s duty to preserve information related to her representation of the plaintiff, Judge Tomlinson stated:

“The Court concludes that Katsos’ duty to preserve documents arose as early as late February 2009, when Michael DiStefano terminated the attorney-client relationship between Plaintiffs and Defendants.”  On February 24, 2009, the plaintiff send the defendant a letter terminating the representation “immediately” and stated that he would “communicate with you further, in writing, so as to explain the reasons why I am discharging you.”  Noting that the “language of Michael DiStefano’s letter gives the appearance that Distefano was not satisfied with Katsos’ work”, Judge Tomlinson also noted that “[i]n assessing whether litigation was reasonably foreseeable in these circumstances, the Court cannot ignore the fact that Katsos is an attorney and should have been attuned to the prospect of litigation.”

To determine the defendant’s culpable state of mind, Judge Tomlinson ordered a hearing on May 13 for the defendant to “be prepared to testify regarding, among other things, the following areas:

  1. Katsos’ normal document preservation/retention/deletion/destruction practices;
  2. the number of computers utilized in her office prior to 2009, when the computers were purchased, and the specific circumstances surrounding the breakdown of each of those computers;
  3. the service agreements for those computers and the vendor(s) used;
  4. whether Katsos maintained a network server;
  5. AOL’s automatic deletion policies to the extent they were explained to Katsos;
  6. a complete list of every email address used by Defendant Law Offices of Barbara H. Katsos, PC and Defendant Barbara Katsos or her staff to communicate with Plaintiffs;
  7. Katsos’ attempts to gain access to the email accounts used by her paralegals and interns referenced in Paragraph 5 of Katsos Aff. II and page 16 of Plaintiffs’ Memorandum;
  8. the document preservation steps undertaken by Katsos when Plaintiffs instituted an adversary proceeding against her in March of 2010;
  9. the retention and utilization of the services of Jan Sloboda.” (the third-party individual that advised her to replace her computers)

The plaintiffs were also ordered to identify “general categories of documents that have been adversely affected” to help determine the relevance of the data in question and were permitted to question the defendant at the hearing.

So, what do you think?  Was this an appropriate course of action to determine whether sanctions are appropriate?  Please share any comments you might have or if you’d like to know more about a particular topic.

Disclaimer: The views represented herein are exclusively the views of the author, and do not necessarily represent the views held by CloudNine Discovery. eDiscoveryDaily is made available by CloudNine Discovery solely for educational purposes to provide general information about general eDiscovery principles and not to provide specific legal advice applicable to any particular circumstance. eDiscoveryDaily should not be used as a substitute for competent legal advice from a lawyer you have retained and who has agreed to represent you.
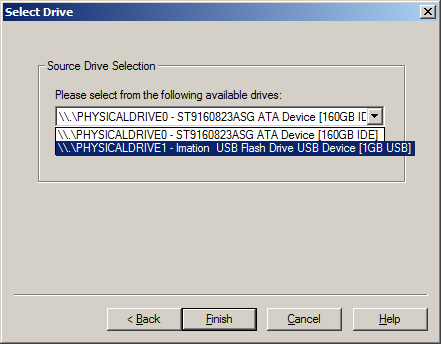
Image is Everything, But it Doesn’t Have to Cost Anything – eDiscovery Best Practices

Do you remember this commercial?  Can you believe it’s 23 years old?

Let’s recap.  So far, in our discussion of free utilities for collection of data for eDiscovery, we’ve discussed the pitfalls of using drag and drop, the benefits of Robocopy (illustrating with the same example copy) and the benefits (and pitfalls) of Richcopy for targeted collection.  But, are there any free tools that will enable you to perform a bit-by-bit forensic image copy that includes deleted files and slack space data?  Yes, there is.

Forensic Toolkit (FTK) is a computer forensics software application provided by AccessData.  The toolkit includes a standalone disk imaging program called FTK Imager.  FTK Imager is a free tool that saves an image of a hard disk in one file or in segments that may be reconstructed later. It calculates MD5 or SHA-1 hash values of the original and the copy, confirming the integrity of the data before closing the files.

With FTK Imager, you can:

  • Create forensic images of local hard drives, floppy diskettes, Zip disks, CDs, and DVDs, entire folders, or individual files from various places within the media.
  • Preview files and folders on local hard drives, network drives, floppy diskettes, Zip disks, CDs, and DVDs – including files located in container files such as ZIP or RAR files.
  • Preview the contents of forensic images stored on the local machine or on a network drive.
  • Mount an image for a read-only view that leverages Windows Explorer to see the content of the image exactly as the user saw it on the original drive.
  • Export files and folders from forensic images.
  • See and recover files that have been deleted from the Recycle Bin, but have not yet been overwritten on the drive.
  • Create MD5 or SHA-1 hashes of files and generate hash reports for regular files and disk images (including files inside disk images) that you can later use as a benchmark to prove the integrity of your case evidence. When a full drive is imaged, a hash generated by FTK Imager can be used to verify that the image hash and the drive hash match after the image is created, and that the image has remained unchanged since acquisition.

Like all forensically-sound collection tools, it retains the file system metadata (and the file path) and creates a log of the files copied.  You can also provide Case Number, Evidence Number, Unique Description, Examiner, and any Notes for tracking purposes to aid in chain of custody tracking.

To download FTK Imager, you can go to the AccessData Product Downloads page here.  Look for the link for FTK Imager in “Current Releases” (it’s currently the seventh item on the list) and open the folder and select the current version of FTK Imager (currently v3.1.2, released on 12/13/12).

Next week, we will begin to discuss how to use FTK Imager to preview files, create forensic images, recover deleted files and use hash values to validate your image.

So, what do you think?  Have you used FTK Imager as a mechanism for eDiscovery collection?  Please share any comments you might have or if you’d like to know more about a particular topic.

Disclaimer: The views represented herein are exclusively the views of the author, and do not necessarily represent the views held by CloudNine Discovery. eDiscoveryDaily is made available by CloudNine Discovery solely for educational purposes to provide general information about general eDiscovery principles and not to provide specific legal advice applicable to any particular circumstance. eDiscoveryDaily should not be used as a substitute for competent legal advice from a lawyer you have retained and who has agreed to represent you.