Evidence

Export Files and Custom Content Images in FTK Imager – eDiscovery Best Practices

Over the past few weeks, we have talked about the benefits and capabilities of Forensic Toolkit (FTK) Imager from AccessData (and obtaining your own free copy), how to create a disk image and how to add evidence items with FTK Imager for the purpose of reviewing the contents of evidence items, such as physical drives or images that you’ve created.  This week, let’s discuss how to export files and how to create a custom content image of a targeted collection of files.

Sometimes, you don’t want to create an image of the entire drive; instead, you’d like to perform a targeted collection or export individual files to review them.  Let’s discuss how to do that.

Export Files

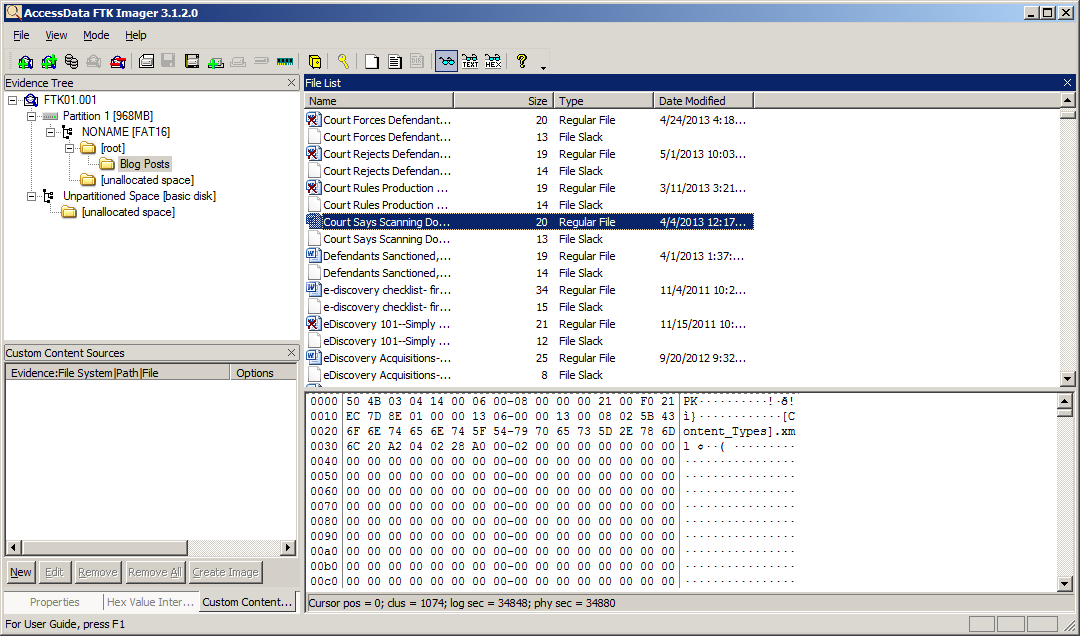
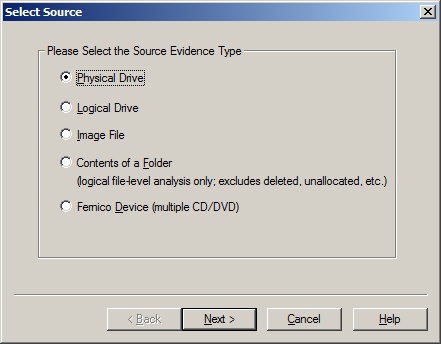
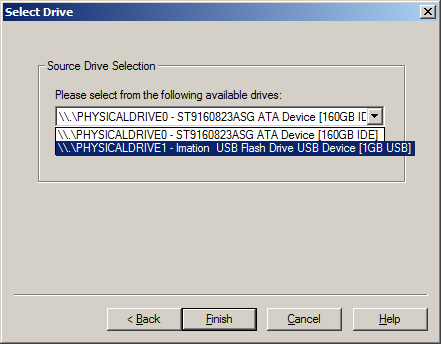
As we discussed last time, you can Add Evidence Item to add a single evidence item to the evidence tree.  You can select a Physical Drive or Logical Drive, an Image File to view an image file created before or Contents of a Folder, to look at a specific folder.  You can also Add All Attached Devices to add all of the attached physical and logical devices.  When you select one or more evidence items, the selected items will be displayed in the Evidence Tree on the left hand side; navigate to the folder you want and it will display the contents on the right hand side.

Select one or more files (use Ctrl+Click to select multiple files or Shift+Click to select a range of files), then right-click on one of the files to display a popup menu.

Select Export Files to export the selected files, then FTK Imager will prompt you for a folder where the files will be saved.  The files will be saved to that folder.  Exporting files can be useful to pull a copy of selected files out of a forensic image for review.

Create Custom Content Image

As you’ll notice in the previous section, when you display the popup menu, another choice is to Add to Custom Content Image (AD1).  This enables you to start building a targeted list of files to be included in a custom image – useful if you want a specific group of files and not everything on the evidence item.

Any files that you select will then be added to the Custom Content Sources pane in the lower left window.  Continue adding items by repeating this step until you’ve specified or selected all the evidence files you want to add to this Custom Content image.  You can also use the Edit button to open the Wild Card Options dialog and select all files that meet a certain criteria (e.g., “My Documents|*.doc” will collect all files with a .doc extension in any folder named My Documents).

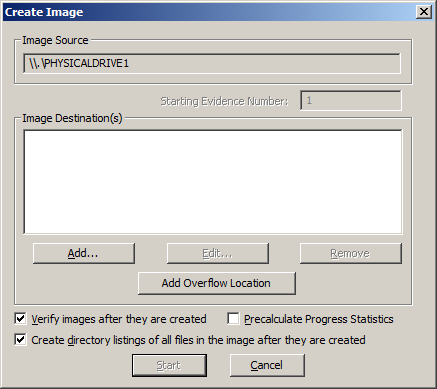
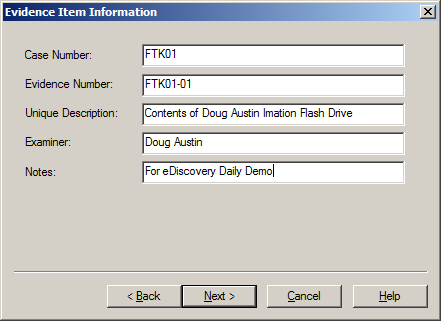
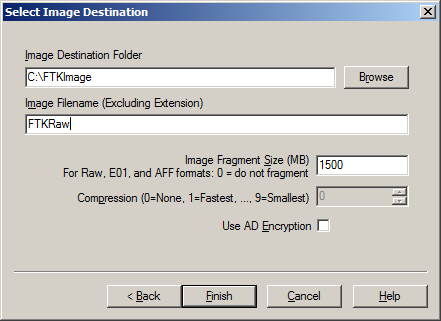
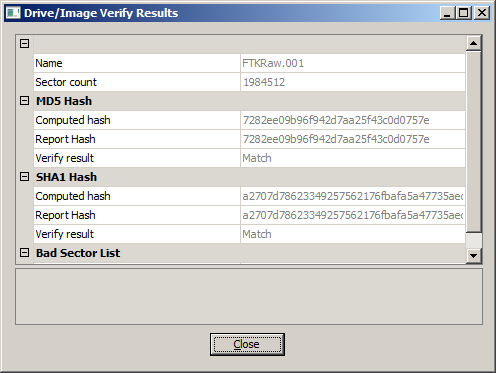
Once you have built your desired list of files, you can then build your Custom Content Image.  Select Create Custom Content Image from the file menu.  You can then repeat the steps for the Create Image, Evidence Item Information, Select Image Destination, Drive/Image Verify Results and Image Summary forms as illustrated in our earlier post How to Create an Image Using FTK Imager.  The resulting image will have an AD1 extension.  Then, this image can be examined just like any other image.

For more information, go to the Help menu to access the User Guide in PDF format.

Next time, we will discuss how to Obtain Protected Files to collect a user’s account information and possible passwords to other files.

So, what do you think?  Have you used FTK Imager as a mechanism for eDiscovery collection?  Please share any comments you might have or if you’d like to know more about a particular topic.

Disclaimer: The views represented herein are exclusively the views of the author, and do not necessarily represent the views held by CloudNine Discovery. eDiscoveryDaily is made available by CloudNine Discovery solely for educational purposes to provide general information about general eDiscovery principles and not to provide specific legal advice applicable to any particular circumstance. eDiscoveryDaily should not be used as a substitute for competent legal advice from a lawyer you have retained and who has agreed to represent you.

Some Additional Perspective on the EDRM Enron Data Set “Controversy” – eDiscovery Trends

Sharon Nelson wrote a terrific post about the “controversy” regarding the Electronic Discovery Reference Model (EDRM) Enron Data Set in her Ride the Lightning blog (Is the Enron E-Mail Data Set Worth All the Mudslinging?).  I wanted to repeat some of her key points here and offer some of my own perspective directly from sitting in on the Data Set team during the EDRM Annual Meeting earlier this month.

But, First a Recap

To recap, the EDRM Enron Data Set, sourced from the FERC Enron Investigation release made available by Lockheed Martin Corporation, has been a valuable resource for eDiscovery software demonstration and testing (we covered it here back in January 2011).  Initially, the data was made available for download on the EDRM site, then subsequently moved to Amazon Web Services (AWS).  However, after much recent discussion about personally-identifiable information (PII) data (including social security numbers, credit card numbers, dates of birth, home addresses and phone numbers) available within FERC (and consequently the EDRM Data Set), the EDRM Data Set was taken down from the AWS site.

Then, a couple of weeks ago, EDRM, along with Nuix, announced that they have republished version 1 of the EDRM Enron PST Data Set (which contains over 1.3 million items) after cleansing it of private, health and personal financial information. Nuix and EDRM have also published the methodology Nuix’s staff used to identify and remove more than 10,000 high-risk items, including credit card numbers (60 items), Social Security or other national identity numbers (572), individuals’ dates of birth (292) and other personal data.  All personal data gone, right?

Not so fast.

As noted in this Law Technology News article by Sean Doherty (Enron Sandbox Stirs Up Private Data, Again), “Index Engines (IE) obtained a copy of the Nuix-cleansed Enron data for review and claims to have found many ‘social security numbers, legal documents, and other information that should not be made public.’ IE evidenced its ‘find’ by republishing a redacted version of a document with PII” (actually, a handful of them).  IE and others were quite critical of the effort by Nuix/EDRM and the extent of the PII data still remaining.

As he does so well, Rob Robinson has compiled a list of articles, comments and posts related to the PII issue, here is the link.

Collaboration, not criticism

Sharon’s post had several observations regarding the data set “controversy”, some of which are repeated here:

  • “Is the legal status of the data pretty clear? Yes, when a court refused to block it from being made public apparently accepting the greater good of its release, the status is pretty clear.”
  • “Should Nuix be taken to task for failure to wholly cleanse the data? I don’t think so. I am not inclined to let perfect be the enemy of the good. A lot was cleansed and it may be fair to say that Nuix was surprised by how much PII remained.”
  • “The terms governing the download of the data set made clear that there was no guarantee that all the PII was removed.” (more on that below in my observations)
  • “While one can argue that EDRM should have done something about the PII earlier, at least it is doing something now. It may be actively helpful to Nuix to point out PII that was not cleansed so it can figure out why.”
  • “Our expectations here should be that we are in the midst of a cleansing process, not looking at the data set in a black or white manner of cleansed or uncleansed.”
  • “My suggestion? Collaboration, not criticism. I believe Nuix is anxious to provide the cleanest version of the data possible – to the extent that others can help, it would be a public service.”

My Perspective from the Data Set Meeting

I sat in on part of the Data Set meeting earlier this month and there was a couple of points discussed during the meeting that I thought were worth relaying:

1.     We understood that there was no guarantee that all of the PII data was removed.

As with any process, we understood that there was no effective way to ensure that all PII data was removed after the process was complete and discussed needing a mechanism for people to continue to report PII data that they find.  On the download page for the data set, there was a link to the legal disclaimer page, which states in section 1.8:

“While the Company endeavours to ensure that the information in the Data Set is correct and all PII is removed, the Company does not warrant the accuracy and/or completeness of the Data Set, nor that all PII has been removed from the Data Set. The Company may make changes to the Data Set at any time without notice.”

With regard to a mechanism for reporting persistent PII data, there is this statement on the Data Set page on the EDRM site:

PII: These files may contain personally identifiable information, in spite of efforts to remove that information. If you find PII that you think should be removed, please notify us at mail@edrm.net.”

2.     We agreed that any documents with PII data should be removed, not redacted.

Because the original data set, with all of the original PII data, is available via FERC, we agreed that any documents containing sensitive personal information should be removed from the data set – NOT redacted.  In essence, redacting those documents is putting a beacon on them to make it easier to find them in the FERC set or downloaded copies of the original EDRM set, so the published redacted examples of missed PII only serves to facilitate finding those documents in the original sets.

Conclusion

Regardless of how effective the “cleansing” of the data set was perceived to be by some, it did result in removing over 10,000 items with personal data.  Yet, some PII data evidently remains.  While some people think (and they may have a point) that the data set should not have been published until after an independent audit for remaining PII data, it seems impractical (to me, at least) to wait until it is “perfect” before publishing the set.  So, when is it good enough to publish?  That appears to be open to interpretation.

Like Sharon, my hope is that we can move forward to continue to improve the Data Set through collaboration and that those who continue to find PII data in the set will notify EDRM, so that they can remove those items and continue to make the set better.  I’d love to see the Data Set page on the EDRM site reflect a history of each data set update, with the revision date, the number of additional PII items found and removed and who identified them (to give credit to those finding the data).  As Canned Heat would say, “Let’s Work Together”.

And, we haven’t even gotten to version 2 of the Data Set yet – more fun ahead!  🙂

So, what do you think?  Have you used the EDRM Enron Data Set?  If so, do you plan to download the new version?  Please share any comments you might have or if you’d like to know more about a particular topic.

Disclaimer: The views represented herein are exclusively the views of the author, and do not necessarily represent the views held by CloudNine Discovery. eDiscoveryDaily is made available by CloudNine Discovery solely for educational purposes to provide general information about general eDiscovery principles and not to provide specific legal advice applicable to any particular circumstance. eDiscoveryDaily should not be used as a substitute for competent legal advice from a lawyer you have retained and who has agreed to represent you.

Hard Drive Turned Over to Criminal Defendant – Eight Years Later – eDiscovery Case Law

If you think discovery violations by the other side can cause you problems, imagine being this guy.

As reported by WRAL.com in Durham, North Carolina, the defense in State of North Carolina v. Raven S. Abaroa, No. 10 CRS 1087 filed a Motion to Dismiss the Case for Discovery Violations after the state produced a forensic image of a hard drive (in the middle of trial) that had been locked away in the Durham Police Department for eight years.

After the state responded to the defendant’s March 2010 discovery request, the defendant filed a Motion to Compel Discovery in October 2012, alleging that the state had failed to disclose all discoverable “information in the possession of the state, including law enforcement officers, that tends to undermine the statements of or reflects negatively on the credibility of potential witnesses”.  At the hearing on the motion, the Assistant DA stated that all emails had been produced and the court agreed.

On April 29 of this year, the defendant filed another Motion to Compel Specific Items of Discovery “questioning whether all items within the state’s custody had been revealed, including information with exculpatory or impeachment value”.  Once again, the state assured the court it had met its discovery obligations and the court again denied the motion.

During pre-trial preparation of a former forensic examiner of the Durham Police Department (DPD) and testimony of detectives in the case, it became apparent that a hard drive of the victim’s that was imaged was never turned over to the defense.  On May 15, representatives of the DPD located the image from the victim’s hard drive which had been locked away in a cabinet for eight years.  Once defense counsel obtained a copy of the drive, their forensic examiner retrieved several emails between the victim and her former boyfriend that were exchanged within a few weeks of the murder that belied the prosecution’s portrayal of the defendant as an unfaithful, verbally abusive and controlling husband feared by his wife.  In testimony, the defendant’s forensic examiner testified that had he known about the hard drive in 2005, steps could have been taken to preserve the emails on the email server and that they could have provided a better snapshot of the victim’s email and Internet activity.

This led to the filing of the Motion to Dismiss the Case for Discovery Violations by the defense (link to the filing here).

As reported by WTVD, Judge Orlando Hudson, having been recently ruled against by the North Carolina Court of Appeals in another murder case where he dismissed the case based on discovery violations by Durham prosecutors, denied the defense’s requests for a dismissal or a mistrial.  Sounds like interesting grounds for appeal if the defendant is convicted.

So, what do you think?  Should the judge have granted the defense’s request for a dismissal, or at least a mistrial?  Please share any comments you might have or if you’d like to know more about a particular topic.

Disclaimer: The views represented herein are exclusively the views of the author, and do not necessarily represent the views held by CloudNine Discovery. eDiscoveryDaily is made available by CloudNine Discovery solely for educational purposes to provide general information about general eDiscovery principles and not to provide specific legal advice applicable to any particular circumstance. eDiscoveryDaily should not be used as a substitute for competent legal advice from a lawyer you have retained and who has agreed to represent you.

Adding Evidence Items with FTK Imager – eDiscovery Best Practices

A couple of weeks ago, we talked about the benefits and capabilities of Forensic Toolkit (FTK) Imager, which is a computer forensics software application provided by AccessData, as well as how to download your own free copy.  Then, last week, we discussed how to create a disk image.  This week, let’s discuss how to add evidence items with FTK Imager for the purpose of reviewing the contents of evidence items, such as physical drives or images that you’ve created.

Adding Evidence Items Using FTK Imager

Last week, I created an image of one of my flash drives to illustrate the process of creating an image.  Let’s take a look at that image as an evidence item.

From the File menu, you can select Add Evidence Item to add a single evidence item to the evidence tree.  You can also select Add All Attached Devices to add all of the attached physical and logical devices (If no media is present in an attached device such as a CD- or DVD-ROM or a DVD-RW, the device is skipped).  In this case we’ll add a single evidence item.

Source Evidence Type: The first step is to identify the source type that you want to review.  You can select Physical Drive or Logical Drive (as we noted before, a physical device can contain more than one logical drive).  You can also select an Image File to view an image file you created before or Contents of a Folder, to look at a specific folder.  In this example, we’ll select Image File to view the image of the flash drive we created and locate the source path of the image file.

The evidence tree will then display the item – you can keep adding evidence items if you want to look at more than one at once.  The top node is the selected item, from which you can drill down to the contents of the item.  This includes partitions and unpartitioned space, folders from the root folder on down and unallocated space, which could contain recoverable data.  Looking at the “Blog Posts” folder, you see a list of files in the folder, along with file slack.  File slack is the space between the end of a file and the end of the disk cluster in which it is stored. It’s common because data rarely fills clusters exactly, and residual data occur when a smaller file is written into the same cluster as a previous larger file, leaving potentially meaningful data.

You’ll also notice that some of the files have an “X” on them – these are files that have been deleted, but not overwritten.  So, with FTK Imager, you can not only view active data, you can also view inactive data in deleted files, file slack or unallocated space!  When you click on a file, you can view the bit-by-bit contents of the file in the lower right window.  You can also right-click on one or more files (or even an entire folder) to display a pop-up menu to enable you to export a copy of the file(s) out and review them with the native software.  You can also Add to Custom Content Image to begin compiling a list of files to put into an image, enabling you to selectively include specific files (instead of all of the files from the device) into the image file you create.

Next time, we’ll discuss Add to Custom Content Image in more detail and discuss creating the custom content image of specific files you select.

For more information, go to the Help menu to access the User Guide in PDF format.

So, what do you think?  Have you used FTK Imager as a mechanism for eDiscovery collection?  Please share any comments you might have or if you’d like to know more about a particular topic.

Disclaimer: The views represented herein are exclusively the views of the author, and do not necessarily represent the views held by CloudNine Discovery. eDiscoveryDaily is made available by CloudNine Discovery solely for educational purposes to provide general information about general eDiscovery principles and not to provide specific legal advice applicable to any particular circumstance. eDiscoveryDaily should not be used as a substitute for competent legal advice from a lawyer you have retained and who has agreed to represent you.

Defendant Compelled by Court to Produce Metadata – eDiscovery Case Law

Remember when we talked about the issue of metadata spoliation resulting from “drag and drop” to collect files?  Here’s a case where it appears that method may have been used, resulting in a judgment against the producing party.

In AtHome Care, Inc. v. The Evangelical Lutheran Good Samaritan Society, No. 1:12-cv-053-BLW (D. ID. Apr. 30, 2013), Idaho District Judge B. Lynn Winmill granted the plaintiff’s motion to compel documents, ordering the defendant to identify and produce metadata for the documents in this case.

In this pilot project contract dispute between two health care organizations, the plaintiff filed a motion to compel after failing to resolve some of the discovery disputes with the defendant “through meet and confers and informal mediation with the Court’s staff”.  One of the disputes was related to the omission of metadata in the defendant’s production.

Judge Winmill stated that “Although metadata is not addressed directly in the Federal Rules of Civil Procedure, it is subject to the same general rules of discovery…That means the discovery of metadata is also subject to the balancing test of Rule 26(b)(2)(C), which requires courts to weigh the probative value of proposed discovery against its potential burden.” {emphasis added}

“Courts typically order the production of metadata when it is sought in the initial document request and the producing party has not yet produced the documents in any form”, Judge Winmill continued, but noted that “there is no dispute that Good Samaritan essentially agreed to produce metadata, and would have produced the requested metadata but for an inadvertent change to the creation date on certain documents.”

The plaintiff claimed that the system metadata was relevant because its claims focused on the unauthorized use and misappropriation of its proprietary information and whether the defendant used the plaintiff’s proprietary information to create their own materials and model, contending “that the system metadata can answer the question of who received what information when and when documents were created”.  The defendant argued that the plaintiff “exaggerates the strength of its trade secret claim”.

Weighing the value against the burden of producing the metadata, Judge Winmill ruled that “The requested metadata ‘appears reasonably calculated to lead to the discovery of admissible evidence.’ Fed.R. Civ.P. 26(b)(1). Thus, it is discoverable.” {emphasis added}

“The only question, then, is whether the burden of producing the metadata outweighs the benefit…As an initial matter, the Court must acknowledge that Good Samaritan created the problem by inadvertently changing the creation date on the documents. The Court does not find any degree of bad faith on the part of Good Samaritan — accidents happen — but this fact does weight in favor of requiring Good Samaritan to bear the burden of production…Moreover, the Court does not find the burden all that great.”

Therefore, the plaintiff’s motion to compel production of the metadata was granted.

So, what do you think?  Should a party be required to produce metadata?  Please share any comments you might have or if you’d like to know more about a particular topic.

Disclaimer: The views represented herein are exclusively the views of the author, and do not necessarily represent the views held by CloudNine Discovery. eDiscoveryDaily is made available by CloudNine Discovery solely for educational purposes to provide general information about general eDiscovery principles and not to provide specific legal advice applicable to any particular circumstance. eDiscoveryDaily should not be used as a substitute for competent legal advice from a lawyer you have retained and who has agreed to represent you.

Version 1 of the EDRM Enron Data Set NOW AVAILABLE – eDiscovery Trends

Last week, we reported from the Annual Meeting for the Electronic Discovery Reference Model (EDRM) group and discussed some significant efforts and accomplishments by each of the project teams within EDRM.  That included an update from the EDRM Data Set project, where an effort was underway to identify and remove personally-identifiable information (“PII”) data from the EDRM Data Set.  Now, version 1 of the Data Set is completed and available for download.

To recap, the EDRM Enron Data Set, sourced from the FERC Enron Investigation release made available by Lockheed Martin Corporation, has been a valuable resource for eDiscovery software demonstration and testing (we covered it here back in January 2011).  Initially, the data was made available for download on the EDRM site, then subsequently moved to Amazon Web Services (AWS).  However, after much recent discussion about PII data (including social security numbers, credit card numbers, dates of birth, home addresses and phone numbers) available within FERC (and consequently the EDRM Data Set), the EDRM Data Set was taken down from the AWS site.

Yesterday, EDRM, along with Nuix, announced that they have republished version 1 of the EDRM Enron PST Data Set (which contains over 1.3 million items) after cleansing it of private, health and personal financial information. Nuix and EDRM have also published the methodology Nuix’s staff used to identify and remove more than 10,000 high-risk items.

As noted in the announcement, Nuix consultants Matthew Westwood-Hill and Ady Cassidy used a series of investigative workflows to identify the items, which included:

  • 60 items containing credit card numbers, including departmental contact lists that each contained hundreds of individual credit cards;
  • 572 items containing Social Security or other national identity numbers—thousands of individuals’ identity numbers in total;
  • 292 items containing individuals’ dates of birth;
  • 532 items containing information of a highly personal nature such as medical or legal matters.

While the personal data was (and still is) available via FERC long before the EDRM version was created, completion of this process will mean that many in the eDiscovery industry that rely on this highly useful data set for testing and software demonstration can now use a version which should be free from sensitive personal information!

For more information regarding the announcement, click here. The republished version 1 of the Data Set, as well as the white paper discussing the methodology is available at nuix.com/enron.  Nuix is currently applying the same methodology to the EDRM Enron Data Set v2 (which contains nearly 2.3 million items) and will publish to the same site when complete.

So, what do you think?  Have you used the EDRM Enron Data Set?  If so, do you plan to download the new version?  Please share any comments you might have or if you’d like to know more about a particular topic.

Disclaimer: The views represented herein are exclusively the views of the author, and do not necessarily represent the views held by CloudNine Discovery. eDiscoveryDaily is made available by CloudNine Discovery solely for educational purposes to provide general information about general eDiscovery principles and not to provide specific legal advice applicable to any particular circumstance. eDiscoveryDaily should not be used as a substitute for competent legal advice from a lawyer you have retained and who has agreed to represent you.

Plaintiff Granted Access to Defendant’s Database – eDiscovery Case Law

Last week in the EDRM Annual Meeting, one of our group discussion sessions was centered on production and presentation of native files – a topic which has led to the creation of a new EDRM project to address standards for working with native files in these areas.  This case provides an example of a unique form of native production.

In Advanced Tactical Ordnance Systems, LLC v. Real Action Paintball, Inc., No. 1:12-CV-296 (N.D. Ind. Feb. 25, 2013), Indiana Magistrate Judge Roger B. Cosbey took the unusual step of allowing the plaintiff direct access to a defendant company’s database under Federal Rule of Civil Procedure 34 because the plaintiff made a specific showing that the information in the database was highly relevant to the plaintiff’s claims, the benefit of producing it substantially outweighed the burden of producing it, and there was no prejudice to the defendant.

In this case involving numerous claims, including trademark infringement and fraud, Advanced Tactical Ordnance Systems LLC (“ATO”) sought expedited discovery after it obtained a temporary restraining order against the defendants. One of its document requests sought the production of defendant Real Action Paintball’s OS Commerce database to search for responsive evidence. Real Action objected, claiming that the request asked for confidential and sensitive information from its “most important asset” that would give the plaintiff a competitive advantage and that the request amounted to “‘an obvious fishing expedition.”

To decide the issue, Judge Cosbey looked to Federal Rule of Civil Procedure 34(a)(1)(A), which allows parties to ask to “inspect, copy, test, or sample . . . any designated documents or electronically stored information . . . stored in any medium from which information can be obtained either directly or, if necessary, after translation by the responding party into a reasonably usable form.” The advisory committee notes to this rule explain that the testing and sampling does not “create a routine right of direct access to a party’s electronic information system, although such access might be justified in some circumstances.” Judge Cosbey also considered whether the discovery request was proportionate under Federal Rule of Civil Procedure 26(b)(2)(C)(iii), comparing the “burden or expense” of the request against its “likely benefit, considering the needs of the case, the amount in controversy, the parties’ resources, the importance of the issues at stake in the action, and the importance of the discovery in resolving the issues.”

Based on its analysis, Judge Cosbey permitted ATO’s request. The benefits of allowing the plaintiff to access the defendant’s OS Commerce database outweighed the burden of producing data from it, especially because the parties had entered a protective order. The information was particularly important to the plaintiff’s argument that the defendant was using hidden metatags referencing ATO’s product to improve its results in search engines, thereby stealing the plaintiff’s customers.

Despite the defendant company’s claims that the information the database contained was proprietary and potentially harmful to the business’s competitive advantage, the court found the company failed to establish how the information in the database constituted a trade secret or how its disclosure could harm the company, especially where much of the information had already been produced or was readily available on the company’s website. Moreover, the company could limit the accessibility of the database to “‘Attorneys’ Eyes Only.’”

So, what do you think?  Was it appropriate to grant the plaintiff direct access to the defendant’s database?  Please share any comments you might have or if you’d like to know more about a particular topic.

Case Summary Source: Applied Discovery (free subscription required).  For eDiscovery news and best practices, check out the Applied Discovery Blog here.

Disclaimer: The views represented herein are exclusively the views of the author, and do not necessarily represent the views held by CloudNine Discovery. eDiscoveryDaily is made available by CloudNine Discovery solely for educational purposes to provide general information about general eDiscovery principles and not to provide specific legal advice applicable to any particular circumstance. eDiscoveryDaily should not be used as a substitute for competent legal advice from a lawyer you have retained and who has agreed to represent you.

How to Create an Image Using FTK Imager – eDiscovery Best Practices

A few days ago, we talked about the benefits and capabilities of Forensic Toolkit (FTK), which is a computer forensics software application provided by AccessData, as well as how to download your own free copy.  Now, let’s discuss how to create a disk image.

Before we begin, it’s important to note that best practices when creating a disk image includes the use of a write blocker.  Write blockers are devices that allow data to be acquired from a drive without creating the possibility of accidentally damaging the drive contents. They allow read commands to pass but block write commands, protecting the drive contents from being changed.  Tableau and FireFly are two examples of write blockers.

It’s also important to note that while we’re showing you how to “try this at home”, use of a certified forensic collection specialist is recommended when collecting data forensically that could require expert testimony on the collection process.

Create an Image Using FTK Imager

I’m going to create an image of one of my flash drives to illustrate the process.  To create an image, select Create Disk Image from the File menu.

Source Evidence Type: To image an entire device, select Physical Drive (a physical device can contain more than one Logical Drive).  You can also create an image of an Image File, which seems silly, but it could be desirable if, say, you want to create a more compressed version of the image.  You can also image the specific Contents of a Folder or of a Femico Device (which is ideal for creating images of multiple CDs or DVDs with the same parameters).  In this example, we’ll select Physical Drive to create an image of the flash drive.

Source Drive Selection: Based on our selection of physical drive, we then have a choice of the current physical drives we can see, so we select the drive corresponding to the flash drive.

Create Image: Here is where you can specify where the image will be created.  We also always choose Verify images after they are created as a way to run a hash value check on the image file.  You can also Create directory listings of all files in the image after they are created, but be prepared that this will be a huge listing for a typical hard drive with hundreds of thousands of entries.

Select Image Type: This indicates the type of image file that will be created – Raw is a bit-by-bit uncompressed copy of the original, while the other three alternatives are designed for use with a specific forensics program.  We typically use Raw or E01, which is an EnCase forensic image file format.  In this example, we’re using Raw.

Evidence Item Information: This is where you can enter key information about the evidence item you are about to create to aid in documenting the item.  This information will be saved as part of the image summary information once the image is complete.

Select Image Destination: We’ll browse to a folder that I’ve created called “FTKImage” on the C: drive and give the image a file name.  Image Fragment Size indicates the size of each fragment when you want to break a larger image file into multiple parts.  Compression indicates the level of compression of the image file, from 0 (no compression) to 9 (maximum compression – and a slower image creation process).  For Raw uncompressed images, compression is always 0.  Use AD Encryption indicates whether to encrypt the image – we don’t typically select that, instead choosing to put an image on an encrypted drive (when encryption is desired).  Click Finish to begin the image process and a dialog will be displayed throughout the image creation process.  Because it is a bit-by-bit image of the device, it will take the same amount of time regardless of how many files are currently stored on the device.

Drive/Image Verify Results: When the image is complete, this popup window will appear to show the name of the image file, the sector count, computed (before image creation) and reported (after image creation) MD5 and SHA1 hash values with a confirmation that they match and a list of bad sectors (if any).  The hash verification is a key check to ensure a valid image and the hash values should be the same regardless which image type you create.

Image Summary: When the image is complete, click the Image Summary button to see the view a summary of the image that is created, including the evidence item information you entered, drive information, hash verification information, etc.  This information is also saved as a text file.

Directory Listing: If you selected Create directory listings of all files in the image, the results will be stored in a CSV file, which can be opened with Excel.

And, there you have it – a bit-by-bit image of the device!  You’ve just captured everything on the device, including deleted files and slack space data.  Next time, we’ll discuss Adding an Evidence Item to look at contents or drives or images (including the image we created here).

For more information, go to the Help menu to access the User Guide in PDF format.

So, what do you think?  Have you used FTK Imager as a mechanism for eDiscovery collection?  Please share any comments you might have or if you’d like to know more about a particular topic.

Disclaimer: The views represented herein are exclusively the views of the author, and do not necessarily represent the views held by CloudNine Discovery. eDiscoveryDaily is made available by CloudNine Discovery solely for educational purposes to provide general information about general eDiscovery principles and not to provide specific legal advice applicable to any particular circumstance. eDiscoveryDaily should not be used as a substitute for competent legal advice from a lawyer you have retained and who has agreed to represent you.

Image is Everything, But it Doesn’t Have to Cost Anything – eDiscovery Best Practices

Do you remember this commercial?  Can you believe it’s 23 years old?

Let’s recap.  So far, in our discussion of free utilities for collection of data for eDiscovery, we’ve discussed the pitfalls of using drag and drop, the benefits of Robocopy (illustrating with the same example copy) and the benefits (and pitfalls) of Richcopy for targeted collection.  But, are there any free tools that will enable you to perform a bit-by-bit forensic image copy that includes deleted files and slack space data?  Yes, there is.

Forensic Toolkit (FTK) is a computer forensics software application provided by AccessData.  The toolkit includes a standalone disk imaging program called FTK Imager.  FTK Imager is a free tool that saves an image of a hard disk in one file or in segments that may be reconstructed later. It calculates MD5 or SHA-1 hash values of the original and the copy, confirming the integrity of the data before closing the files.

With FTK Imager, you can:

  • Create forensic images of local hard drives, floppy diskettes, Zip disks, CDs, and DVDs, entire folders, or individual files from various places within the media.
  • Preview files and folders on local hard drives, network drives, floppy diskettes, Zip disks, CDs, and DVDs – including files located in container files such as ZIP or RAR files.
  • Preview the contents of forensic images stored on the local machine or on a network drive.
  • Mount an image for a read-only view that leverages Windows Explorer to see the content of the image exactly as the user saw it on the original drive.
  • Export files and folders from forensic images.
  • See and recover files that have been deleted from the Recycle Bin, but have not yet been overwritten on the drive.
  • Create MD5 or SHA-1 hashes of files and generate hash reports for regular files and disk images (including files inside disk images) that you can later use as a benchmark to prove the integrity of your case evidence. When a full drive is imaged, a hash generated by FTK Imager can be used to verify that the image hash and the drive hash match after the image is created, and that the image has remained unchanged since acquisition.

Like all forensically-sound collection tools, it retains the file system metadata (and the file path) and creates a log of the files copied.  You can also provide Case Number, Evidence Number, Unique Description, Examiner, and any Notes for tracking purposes to aid in chain of custody tracking.

To download FTK Imager, you can go to the AccessData Product Downloads page here.  Look for the link for FTK Imager in “Current Releases” (it’s currently the seventh item on the list) and open the folder and select the current version of FTK Imager (currently v3.1.2, released on 12/13/12).

Next week, we will begin to discuss how to use FTK Imager to preview files, create forensic images, recover deleted files and use hash values to validate your image.

So, what do you think?  Have you used FTK Imager as a mechanism for eDiscovery collection?  Please share any comments you might have or if you’d like to know more about a particular topic.

Disclaimer: The views represented herein are exclusively the views of the author, and do not necessarily represent the views held by CloudNine Discovery. eDiscoveryDaily is made available by CloudNine Discovery solely for educational purposes to provide general information about general eDiscovery principles and not to provide specific legal advice applicable to any particular circumstance. eDiscoveryDaily should not be used as a substitute for competent legal advice from a lawyer you have retained and who has agreed to represent you.

You Don’t Have to Be Rich to Use Richcopy – eDiscovery Best Practices

A couple of weeks ago, we discussed the pitfalls of using drag and drop for collecting files for eDiscovery and illustrated an example using a blog post that I wrote about a month ago in a Word document for the post Five Common Myths About Predictive Coding.  If you followed the steps along with one of your own files, you noticed that the resulting file appeared to have been modified before it was created, which reflects spoliation of the metadata during the copy process.

Last week, we discussed the benefits of Robocopy, how to access it via the command line prompt (if you have Windows Vista or later) and how to get it (if you don’t).  Then, we performed an example copy (using an Excel script I use to create the copy) and took a look at the results to show how the date metadata was preserved during the copy.  If you’d still like a copy of the Excel Robocopy script, feel free to request it by emailing me at daustin@cloudnincloudnine.comm.

If you want to be able to perform a forensically sound targeted collection, but would prefer a GUI based tool for performing the copy (instead of a command-line tool like Robocopy), then perhaps you should consider Richcopy.  RichCopy is a free computer utility program developed by Ken Tamaru of Microsoft to copy file directories.  It has some advantages, but also some pitfalls, to consider as a targeted copy and collection tool.

One of the benefits of Richcopy (in addition to the GUI interface) is that it copies several files simultaneously (“multi-threaded”), which can drastically reduce the time required for multi-gigabyte file copy operations (earlier versions of Robocopy didn’t support multi-threaded copying, but the current one does, with the /MT[:n] command).

Unfortunately, Richcopy has not been updated in nearly four years by the developer, so you may run into issues (for example, it apparently doesn’t handle file names longer than 255 characters) and, as a free utility, it’s not supported by Microsoft.  Also, Help doesn’t open up throughout much of the application, so getting additional information from the help file is not always easy.  Consider yourself warned.

You can download a copy of Richcopy from the link in this TechNet magazine article.  I did so, and performed the same copy of the Word document for the post Five Common Myths About Predictive Coding that I performed in the other cases.  Let’s see how Richcopy handled that file copy.

You’ll see below that the main form of Richcopy provides the ability to select the source and destination paths, and specify options (as indicated by the red box).  Once you have the parameters set, click the green “Go” button (as indicated by the red circle) to perform the copy.  Progress and logging information will appear in the two status windows below.

The Options button opens a dialog for specifying a variety of options, including copy parameters, thread counts, file attributes and error handling, files to be included and/or excluded (by name, extension or attributes, such as excluding system files) and logging.  As you’ll see below, I set the “files to be included” option to copy the example file I’ve been using in the other tests.

The result?  I did get a copy of the selected file which contained preserved file metadata (i.e., the Created date and the Accessed date reflect the original date and time when the file was created and last accessed).  However, it also copied empty folder for all of the folders underneath the source folder.  I couldn’t figure out how to turn it off and the aforementioned Help file issues didn’t enable me to identify a workaround.

If you absolutely require a GUI interface for free targeted file collection, Richcopy may be a better alternative than Robocopy, but not necessarily the best alternative.  Next week, we’ll begin discussing another free GUI alternative that not only supports targeted collection of files, but also supports bit-by-bit imaging to capture deleted files and slack space data!

So, what do you think?  Have you used Richcopy as a mechanism for eDiscovery collection?  Please share any comments you might have or if you’d like to know more about a particular topic.

Disclaimer: The views represented herein are exclusively the views of the author, and do not necessarily represent the views held by CloudNine Discovery. eDiscoveryDaily is made available by CloudNine Discovery solely for educational purposes to provide general information about general eDiscovery principles and not to provide specific legal advice applicable to any particular circumstance. eDiscoveryDaily should not be used as a substitute for competent legal advice from a lawyer you have retained and who has agreed to represent you.